
Are you new to machine quilting? You may have made tied quilts for a while and now want to explore machine quilting. I’ve seen a lot of advice given for how to machine quilt but I think most of it lacks a couple of points that are important for successful machine quilting. If you are having some issues or maybe just don’t know what needle to use, these can help.

I’m going to give you six tips for straight line machine quilting. However, if you are especially having problems with puckering or tucking on the backs of your quilts or skipped stitches on the tops of your quilts, there are easy solutions to these problems in the following tips.
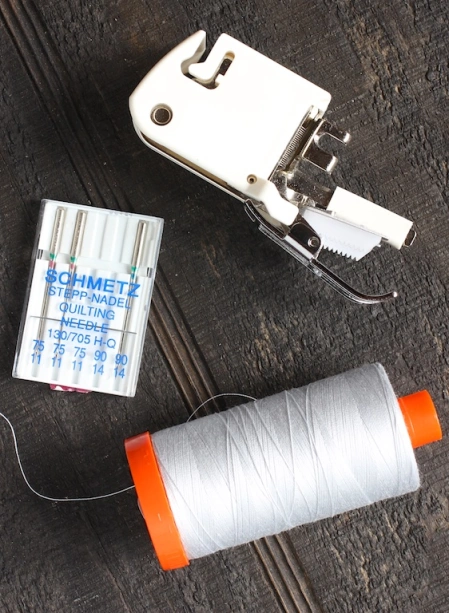
- Use a Walking Foot. If you’re trying to machine quilt with a regular presser foot, you’re going to have problems. Invest in a Walking Foot (sometimes called an Even Feed Foot) if you don’t have one. A walking foot will make your fabric feed evenly on the top and the bottom, not just on the bottom like a regular presser foot will. There will be no bunching up of the fabric when you use a walking foot. Each manufacturer has a walking foot to fit their machines.
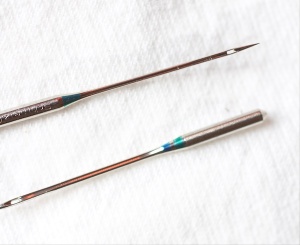
- Use a Quilting Needle. This makes a difference. Don’t use a Universal Needle, which has a slightly rounded point, for machine quilting. Although it can work just fine and you may not have any trouble, quilting needles are better for machine quilting. Quilting Needles are made for a reason! They have slightly heavier shafts and a sharper point to get through thick layers of batting and intersecting seams. If you are having skipped stitches sometimes, a Quilting Needle can eliminate this problem. It can also help a lot with any tucking or puckering on the back of your quilt.
- Use a Heavier Needle. I piece with an 11 needle and I switch to a 14 when I begin my machine quilting. Makes a BIG difference! Many people do not switch up a size when they quilt. Your quilting will be easier if you use a heavier needle. I like to buy these packs of Quilting needles by Schmetz, which contain the two sizes I use most often, 11 and 14.
- Decrease Your Presser Foot Pressure. If your machine has this adjustment, use it. My Janome is set to 5 for regular sewing, but I switch it down to 3 when I start quilting. It makes it easier for the quilt sandwich to move through the machine. This can also help with any tucking or puckering on the back of your quilt.
- Use Quilting Gloves. These gloves are grippy and will be a revelation to you if you’ve been quilting without them. They enable you to really firmly hold on to the quilt as you move it through the machine. Plus I believe they help prevent any oils and dirt from your hands in getting on the quilt as you are quilting it. These are the kind I use but there are many different manufacturers.
- Change Your Needles Often. It’s never good to let your needle get dull. This can cause problems – like skipped stitches – and needles are cheap. Some people change their needles every time they begin a new quilt.
These are tips that I feel will help you immensely, especially if you are wondering why you might be getting tucks on the back of your quilt or skipped stitches. Give them a try on your next quilting project.
SOME HELPFUL LINKS:
Machine Needle Guide by Schmetz
Ever have a needle laying around and you don’t know what it is? Stop guessing!
How to Identity your Schmetz Needle by the Color Band
Have a great week!
Elaine

Pingback: 6 Tips For Machine Quilting – Quilting – Mix Of Tips
Pingback: 6 Tips For Machine Quilting
Thank you, anneliesehb@gmail.com
LikeLike
Valuable information…thank you!
LikeLike
Very helpful.. THANKYOU
LikeLike
I did not know about quilting needles , thank you
LikeLike
Thanks for the tips in quilting
LikeLike
These tips helped me soooo much. Loosening the tension was the best tip for me. Thanks for the tips.
LikeLike
These tips are wonderful. Thank you!
LikeLike
Always appreciate learning things to make life easier! Thank youu
LikeLike
Great tips! I have been quilting for a.number of years. I try to read all tips as I always learn something from everyone!
LikeLike
Thank you! These are very helpful and some I did not know.
LikeLike
Great post. I’m a new sewer and learning from my mistakes. This was very helpful.
LikeLike
I make a scrap 10×10 or what I have left, sandwich batting scrap n fabric that I dont care to waste. I practice stitching on it before I do my quilt project.
LikeLike
Great idea – gives you confidence before you begin.
LikeLike
Good pointers! Thank you
LikeLike
Thanks so much for this . I would never have thought about the needle . What type of thread do you use. My spools keep breaking which is annoying
LikeLike
I use Aurifil thread, 100% cotton.
LikeLike
Schmetz needles has an App that you can download for free. It has all the details about needles, color, and sizes. Very handy to have.
LikeLike
Thanks for sharing!
LikeLike
Thank you. The tips are very helpful to me.
LikeLike
Is Aurifil better than masterpiece?
LikeLike
Great information, but I need another important tutorial. I’ve watched how to begin the machine quilting process – but can’t manage to do it correctly. You are so good at explaining. Can you make a demo video of this process?
Ellen in Michigan
LikeLike
Hi Ellen: What part of beginning the quilting process are you having difficulty with?
LikeLike
It’s been a year since I last looked at the existing tutorials… there is something one does to pull the through the bobbin thread into the quilt body (backing side of quilt) . Can you help with this?
LikeLike
I don’t normally have to do this when I machine quilt, because I start at the edge of the quilt and sew across – that edge will eventually be covered by the binding, so I don’t bother to bring up the bobbin thread. However, if I have to start sewing in the middle of the quilt for some reason (maybe I ran out of bobbin thread in the middle of the quilt or my thread broke) I bring up the bobbin thread this way: Move your needle to the down position and grab the end of the top thread. Move the needle back to the up position and you will see that the bobbin thread will come up through the quilt to the top. Grab the bobbin thread and pull it out a little. Then you can start sewing. I hope this helps!
LikeLike
Thanks for the reply. I’m such a visual learner, that I’d love to see a video of you doing this! I thought it was best to quilt out from the middle to the sides, but I will give this a try!
LikeLike
Ellen: When I say to quilt out from the middle, I meant to start at the middle edge of the quilt. Maybe I need to reword that! Start on one side at the edge, but not at the ends of the quilt – start in the middle and then quilt across the whole width of the quilt. Then quilt out from there, to the sides. Does that make sense?
LikeLike
Yes I understood that. Thank you again for taking this time with me!
LikeLike
I just made my first quilt (quarantined quilt), it has a cross in the middle and I am going to quilt it myself, but I’m not sure of the design that I should use. Would you have any recommendations.
LikeLike
Rosie: The cross is in the middle of the quilt – is the rest of the top just a solid color?
LikeLike
Thank you so much! I’ve been quilting for awhile and using the right needles was always an issue for me. I confess I used what had on hand, usually universals. Just ordered the 11’s and the 14’s. That will make it so much easier than guessing which ones to use. You’ve made it so simple. Thank you again.
LikeLike
So glad the info was useful to you!!
LikeLike
What stitch length do you use? I am finding I get very small stitches at 2.5 length. I think it may be due to speed, but even when I slow down, I think the stitch is too small. Thanks for the tips!
LikeLike
I use my walking foot a lot but for quilting I use a “Free Motion Foot” . It’s a real learning curve but it’s under $20 and you have COMPLETE control of stitch length, direction, design. Try one at a quilt store. I can make circles, loop-de-loop, anything (with the feed dogs off).
LikeLike
Thank you for your suggestion, I appreciate your comment. But still, I wanted to know what stitch length you use when you are using the walking foot.
LikeLike
I actually use a 4.0 stitch length.
LikeLike
Corona means Crown so I am calling this my Crown collection! Have made a “bunch” of quilts. Thanks for the tips – no matter how long I sew there is always something I can learn. Never considered changing the needle. Inventors out there – can you make something that makes changing the needle less aggravating? I love my Janome too but changing the needle even with pliers I get stabbed.
Thanks again, j
LikeLike
Glad I saw this very useful good tips
LikeLike
Thanks I almost missed this until I was alerted by someone else’s comment. Go up in needle size, never thought of that. I also go really slow going backward, the tension seems to be different going back than forward (? True or my imagination?)
LikeLike
Thank you for informing me of the different size needles. I was wondering what the different numbers meant! Also any suggestions for disposing old needles and rotary discs?
LikeLike
Pingback: 6 Tips For Machine Quilting – Quilting
I keep old needles and bent pins in a vitamin bottle.
LikeLike
Thank you so much for the tips !!
LikeLike
I did not know about the needles, thank you!
LikeLike
Good tips! I didn’t know about quilting needles. Thank you. I struggle with trying to quilt on a regular machine. I finally divided it into quarters and so I didn’t have a huge wad of fabric to shove through the throat of the machine. Not perfect but better.
LikeLiked by 1 person
Great hints. I have always hand quilted by hands are not allowing me to do so. I have questions. #1 – What type thread do you use; #2 – what stitches settings do you use?
LikeLike