
I want to give you some tips that I have found actually make my work faster. I’m not going to give you advice that tells you to prewind bobbins or “organize your workspace”. I love to do those things, too, but these tips are actually going to speed up your work. Really. This post is about tools that I have found to be actual time savers in my work and make a real difference. If you are new to quilting, maybe you don’t even know about these tools. There is no way I could be as efficient in my work without using these. They really have been time savers and I want to share them with you and have included a couple of videos which might help you.
Use a Stripology Ruler
When you have a lot of strips to cut for a project a Stripology Ruler will make your work SO much faster. This is one of the best things ever. With my Stripology ruler, I can cut multiple strips quickly and without having to move my ruler. This tool has cutting slots in it for your rotary cutter. Let me show you:
I even use it to do my subcuts sometimes. Just lay your strip sets underneath and make multiple cuts without moving the ruler! It’s pretty awesome:
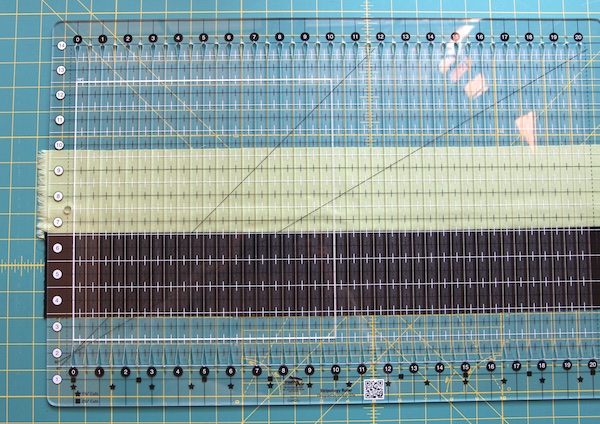
A Stripology Ruler is a bit of an investment, but you will use it all the time to cut strips, once you try it!
Ditch the Pins
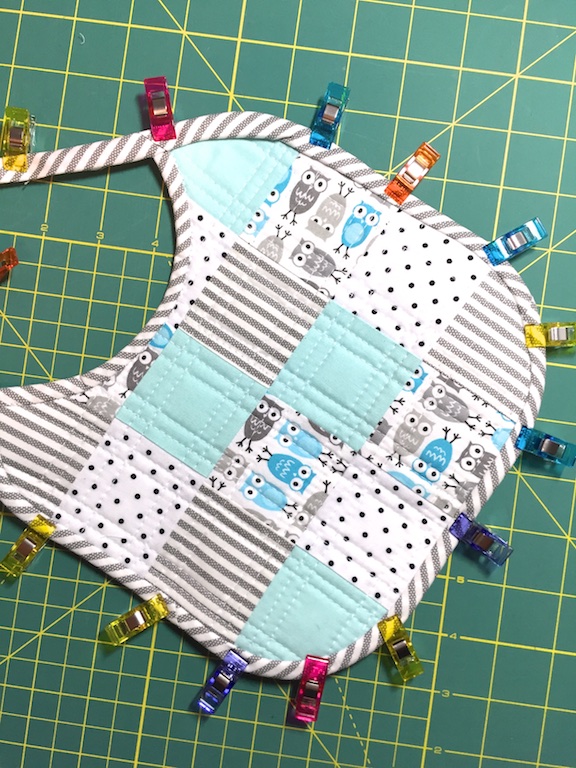
Are you still using pins? If you haven’t discovered Wonder Clips, you don’t know what you’re missing. This could be the single tool that speeds up my work the most. Placing pins into seams takes two motions – one to insert the pin down into the work and another to pop the pin back up to the top of the work. Sounds like a miniscule motion, but when you add it up to the hundreds of times you insert a pin, it takes time. If you use clips instead of pins, you save time – clipping takes one motion and that’s it.
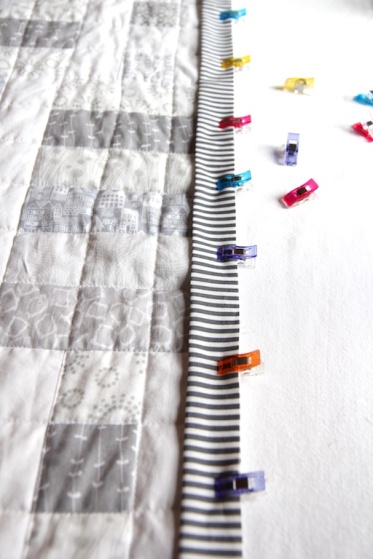
They are also so much better on heavier seams than pins. No need to try to insert pins into heavier seams – that can also distort your accuracy – the Wonder Clips hold firmly and without shifting. Clover even makes Jumbo sized Wonder Clips.
This little project would have been very hard to manage with pins. But with Wonder Clips, they held the binding so easily and securely:
Then when it comes time to sew your seams, I find removing clips is a little faster than removing pins – sometimes pins can stick a little (and clips don’t poke you!).
Use Dedicated Sized Grid Rulers
When cutting squares or trimming blocks, it is a time-saving investment to buy square grid rulers in sizes you use the most. I have square grid rulers in just about every size from 2.5″ up to 6.5″. This range covers the size blocks I make the most. When subcutting squares or trimming blocks, I don’t have to worry about lining up grid lines and making sure my measurement is correct. I just cut along the ruler and that’s it. Saves SO much time. Try trimming 100 blocks that need to be 5″ with a 6.5″ grid ruler. It takes forever. Try trimming 100 blocks that need to be 5″ with a 5″ ruler. You’ll be finished in no time.
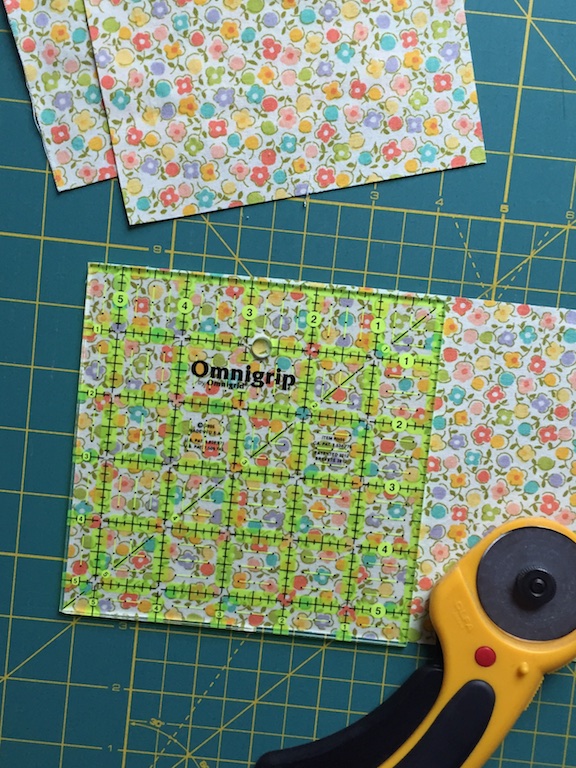
Making 5.5″ blocks with a 5.5″ ruler is much faster
Use Bloc-Loc rulers.
If you are a fan of Half Square Triangles like me, Bloc Loc rulers will be a revelation to you. They also make rulers for Half Square Rectangles and Flying Geese. I like to make my blocks oversized and then trim them to size. Why are these so great? They have a groove cut into the ruler from one corner to the opposite corner that hugs your seam line and allows you to trim HSTs (or whatever) into perfect, uniform blocks without any slipping. Let me show you how this works and how fast it is:
It really does make a huge difference in your time trimming.
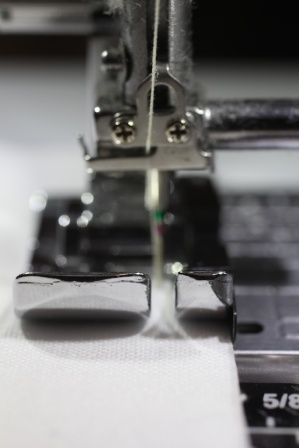
Get a Quarter Inch Presser Foot
Most seams in quilting are a quarter inch. You can certainly line up a quarter inch with your presser foot and just keep your stitching line on that point, but a dedicated quarter inch presser foot makes your sewing faster. It has a guide on the side, to keep your fabric on the right line. It really does speed up the work and I use mine all the time.


I hope this post is helpful to you! If you try even one or two of these tools and it speeds up your work time, it will have been worth it.
Thanks for dropping by,
Elaine

Helpful post, Elaine. Thank you!
I’m curious what you use to protect your table. The only cutting space I have is my beautiful rosewood dining table. I have a self-healing cutting mat but still, I fear going through it at some point.
LikeLike
Linda: I usually put my cutting mat on my kitchen island and in all my years of quilting, I have never had a blade go all the way through the mat. I’ve never heard of that! It would be interesting to know if anyone has had that experience.
LikeLike
Trust me, you will cut through the mat! I personally know this to be true. Don’t ask. I, now, cut on salvaged Formica counter tops I had mounted in my sewing room and replace cutting mats when 5″ line develops a groove. It is dangerous for fingers to cut on worn mats, measurements are inaccurate, and eventually they are cut through to the surface underneath. I use the most popular name brand mats, in case anyone is wondering.
LikeLike
I have been using the same mat for over 24 years and haven’t cut through it yet. I don’t use the lines on the mat for cutting though, so my cuts don’t always fall in the same place. Prolongs the life of the mat which are too expensive for me to replace often.
LikeLike
Hi Linda. I, too, have a lovely dining table I cut on, although now it is in my sewing room. I covered the table with some very thick plastic (perhaps bought at the local hardware store and cut to size) and then invested in the biggest cutting mat I could afford (46″ x 34″). It covers most of the table and has provided incident-free service for at least 10 years. When I periodically have a clean-up and remove everything from the table – mat, plastic, sewing machine, rulers, containers of pins, half-finished blocks, the little embroidery scissors that were lost, essential items that were not thrown out and still haven’t been used – and remove the plastic, the surface of the table is still as pristine as when I first got it. Wonderful! Hope this is of some help.
Cheers, Jan
LikeLike
Any large hardware store should be able to cut a piece of plexiglass to fit your table. It will protect your table wonderfully and be super easy to clean.
LikeLike
Buy a project board made out of cardboard, very inexpensive to lay under your cutting mat if worried.
LikeLiked by 2 people
I use a double layer of mats because my table has a tiled top and when I would get to the spots where the groove was the single mat would droop down just enough to mess up the cut. This double mat is a great system and will definitely put your mind at ease about cutting through the mat. Hope this helps. Kim
LikeLike
I have used the same cutting mat for 20 long years and haven’t managed to get clear through it yet, and I use it nearly everyday!
LikeLike
Thanks for the tips. Love that stripology ruler…. Someday (sigh)
LikeLike
Hi Elaine. I was always of the impression that if you use different rulers in the same project (particularly different brands of rulers) you risk a distortion in the final measurements as no 2 rulers are exactly the same. Therefore I’ve held off buying a range of sizes. Your suggestions makes sense, and I can vouch for the clips but I’d be interested in your thoughts on ruler sizes.
Many thanks,
Jan
LikeLike
Jan: That’s an interesting thought. All my grid rulers are the same brand. I’ve never had any problem!
LikeLike
I’ve heard that too and I’d imagine there is some disparity perhaps with the thickness of the lines or just being a smidge different in size. Having said that, I’ve gradually shifted over to all Creative Grids rulers ( been super happy with them!) from the Omnigrid. It’s expensive but I try to buy during sale times. I plan on selling the Omnigrid rulers I’ve collected over the years. Not too many, but it would be nice to recoup a few dollars! 👍🏻
LikeLike
I have 2 different brands of rulers, Omnigrid and Quilt in a Day rulers. I like the Quilt in a day rulers best because of the lines being clearer than all the yellow lines on the Omnigrids. I am slowly replacing all of the Omnigrid with Quilt in a day rulers. there is a difference in the measurements between the two brands and in the thickness of the rulers too.
LikeLike
Each of these look like great tips. I had never heard of Stripology rulers. I have never tried wonderclips but I’ll keep them in mind. I used my 1/4″ presser foot for the first time with my last quilt – so much easier! It came with my ‘new’ machine which I’ve had for about 18 months but for reason I hadn’t tried it.
LikeLike
WOW! Love this post! Will be heading out today to do some tool shopping. Can’t wait to try some of these out!! Thanks!
LikeLike
I have never seen that type of ruler. Are they hard to find? Thanks for the tops. I have just started using the clips. I would think that a pin would work better to line up blocks when sewing.
LikeLike
Connie: The ruler isn’t hard to find – I have a link to it in the post. As for pins, I feel the Wonder Clips are actually more accurate for lining up blocks.
LikeLike
I use binder clips from the office stores I love them
LikeLike
I use the same! So much cheaper than buying the clips from the craft store and they come in different sizes
LikeLike
Buy. “Wonder” clips online, much cheaper, watch for shipping charges, though.
LikeLike
I love wonder clips and always us them for binding. I really do wan tot invest in a Stripology ruler now I have seen one. Thanks for the tips. x
LikeLike
Yep, LOVE my Stripology ruler. I’m using Wonder clips more now. They don’t lay flat like pins do so they get a little cumbersome, but they are fast. I set the box of wonder clips on the other side of the throat when I sew. Then when I take off the clips as I sew, I just slide them to the far side of the throat and into the waiting box. Easy and fast.
LikeLike
I love my stripology rulers – I have 2 different sizes. They make cutting so much easier.
LikeLike
Wonderful tips. Thank you
LikeLike
Great post! Can you recommend a good source for the patchwork foot? I found some here and there – but one I ordered a while ago is pretty junky, with a plastic piece for the guide. Thanks!
LikeLike
Thank you so much for this post. I havey material ready but have been afraid to actually start cutting! I will be getting some tools to help me succeed.
LikeLike
Best thing I did recently to improve my quilting – 1/4 inch presser foot with guide. Each quilt I make I try to find one thing that I need to focus on to improve the precision and accuracy of my quilting. This was a huge help.
LikeLike
Have a different ruler to cut strips, very old, and it has a hard plastic on the underside, I’ve worn grooves in it. Never saw the ruler with a groove before. Where are they for sale?
LikeLike
Love the clips..pinning does take a lot of time..thanks for tips..looking forward to quilting this winter..
LikeLike
Thought I read somewhere in this that clips aren’t flat. The back of mine is flat, with a curved top foqr easier grip.
LikeLike
Thank you…yes, I learned a few new things.
Carol
LikeLike
Half the fun quilting is buying all the accessories its my new hobby love it
LikeLike
AMAZING yet simple ideas! I’ve been quilting for over forty years and I have never gone through a mat. In order to do you one must be cutting back and forth like one saws at cutting a tough piece of meat. Those mats are designed to prevent going through. The whole idea of using a rotary cutter is for the ease and quickness of cutting. One should not be sawing at fabric or pressing so hard as to go through a mat. If this happens, then one should lighten up significantly on the pressure. A single slice across the cutting line (or along the ruler’s side) is all it should take to cut through the fabric. Change the blade! Do not use the same blade for several projects. I know it sounds wasteful, but it is worth it! Quilting is supposed to RELAX you, lol!!
LikeLike
I have the stripology ruler and have tried it several times. However, I don’t get accurate cuts. Suggestions?
LikeLike
Kathy: Wow! I have no idea why you wouldn’t get accurate cuts on the Stripology ruler. What is happening? Are they the wrong size or are they wavy or what? That’s so weird.
LikeLike
I also save the clips of a pants clothes hanger when i can which also work as a binder clip.
LikeLike
Is there a way to get accurate 1/4″ top stitching with a walking foot?
LikeLike
Diane: You can measure and find the place on your walking foot that would make 1/4″ stitching line and then mark it with a little piece of masking tape. You can also use a tool called a guide bar for your walking foot – I have this and you can set it for any measurement. Hope this helps!
LikeLike