
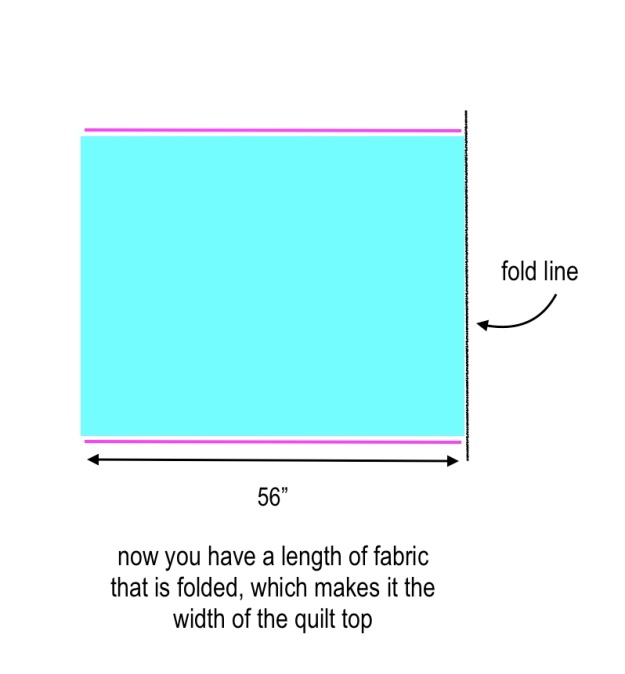
The only part of making a quilt that I do not enjoy is sewing the quilt back. I just hate calculating the dimensions, cutting the pieces and then sewing them together. There are many, many ways to make a quilt back. You can even use 108″ wideback fabric, and not have to cut anything – but the fabric choices for those are limited. So, unless it’s a baby quilt, you almost always have to piece a quilt back. I can give you a method to make it a little easier. Instead of cutting two separate pieces of fabric and sewing them together, you cut one long piece, fold it together and then sew right down one side. You then cut off the little fold line and open the fabric up and you’ve got a quilt back. It’s very easy.
I get a lot of quilting questions from beginner quilters, so I am going to diagram this method out in a really basic way (I hope). If you’re more of an advanced quilter, you won’t need such detailed instructions.
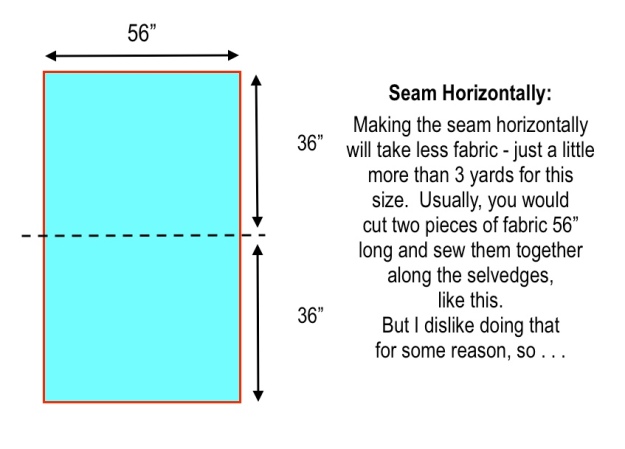
Keep in mind when you calculate dimensions for your quilt back, you have to take into account that although fabric width (WOF) is about 42 – 43″, you have to subtract the selvedges and you need to figure in ½” seams in your allowances. Also, if you want an overage on your quilt back, making it a bit larger than your quilt top, adjust accordingly – I always allow a couple inches all the way around the quilt for an overage. So remember to allow for those in your calculations. The example below doesn’t include overages – it’s just a example.
Also, I’ve recommended this phone app before and I use it all the time – it calculates how much yardage you will need for your backing. It’s QuiltingCalc by Robert Kaufman. Very handy.
This method actually works well for certain directional fabrics, because folding the fabric over on itself lines up the pattern in the same direction. Also, this method only works on quilt tops which are under 80″ in length.


Now just trim the length to the size you want.
Tips:
● Cut the selvedges off before you press the seam open – they are tighter and have less give than the fabric itself and can cause a pucker sometimes. Make a big enough seam so that you can do this. So make your sewing line ½” away from the selvedge. Press the seam open so it lays flat.
● Use a walking foot if you can to sew the seam – it will move the fabric along better, so that it is even.
I hope these instructions make sense and that they are helpful. Do you have a favorite method of piecing a quilt back?
Elaine
Save

thank you!
LikeLike
Can’t wait to try this – I make hospital sized and single bed sized quilts for hospice donation. This could add up to many many yards and lots of $$ in savings for my projects. Wow! And thank you!!!
LikeLike
The only thing you need to know or remember is the fabric you use by sewing a length folded ican not have a directional pattern.
LikeLike
I make up my patchwork with long strips, make them down and sideways then i lay it over the sheeting starting from the middle I sew each row that is the length of the quilt down and across, then the individual squares, takes some time but I enjoy it then i make the hem like a band all round
LikeLike
I purchase yardage that measures 2X the length of my quilt (measuring less than 84” wide) plus 10”.
Remove selvages. Fold the yardage in half, meeting what was the selvages on either side. Trim away the bottom fold by a scant amount. Find the center of one layer of the fabric. Using scissors make a 1/2” clip at the center point. Tear fabric in half. Press seams flat.
Purchase 100% cotton sheets 350-400 thread count. Remove finished edges with scissors or by removing all stitching for maximum yardage, if needed. Voila — a seamless backing!
You will have a wide center panel with smaller panels in each side.
LikeLike
Thank you so much! Great instructions and I will use them! Elaine Osteen940-229-4601 (cell)
LikeLike
Well now I feel kind of silly – never thought of this! I seem to work hard to piece the back in such a way that it is a reversible quilt if possible. But that all started from trying to make the pieced back look like I meant it that way! Thanks for the tip!
LikeLike
Thanks, Elaine! I feel the very same, sometimes that is where a quilts “Stops” for me! …the backing. I will try this!
LikeLike
I’m not sure I’m understanding correctly. If you fold the fabric length back on itself, won’t you have the pattern going in two opposing directions?
LikeLike
Jan: I’m thinking of a fabric like stripes or a pattern that flows one way but is a mirror image – the pattern will still go the right way. It won’t work for all patterns, though – for instance, a text pattern would not work.
LikeLike
Right. Got it. Thanks!
LikeLike
So this is amazing to me! Why have I never thought of doing this? SO much easier than cutting two pieces. Thank you!
LikeLike
Thank you!!!! Never thought I would find anyone to agree with me about quilt backing!!!
LikeLike
What about the width of the quilt? If it was for a regular or queen size quilt? Guess you would have to double this procedure?
LikeLike
Brilliant tip!!! Thank you!
LikeLike
Thank you! Thank you! Thank you!
LikeLike
Does this work for queen & king size quilts too?? I’m having a little trouble imagining how it would work for the larger size. Thanks!!
LikeLike
Toby: I do mention in the post that it only really works for quilts which are under 80″ in length, which is about twice the width of standard 42″ fabric. Hope this helps.
LikeLike
This is fabulous! Thanks so much.
LikeLike
Thank you for this. Why didn’t I ever think of this?
LikeLike
I used this method today and it worked great! So much easier then my old way.
LikeLike
Pingback: Grey and Mustard Arrow Quilt | Beech Tree Lane Handmade
Too late for my backing, but I tried it for the batting (flannel). AWESOME and much easier to work with! Thanks for making it easier for a beginner quilter! Yay!
LikeLike
Will try this tomorrow! Sounds so much easier than what I have done before. The other method I looked into seems more complicated. There is a backing calculator from Robert Kaufman which will tell you how much backing you need. Thanks so much for the instructions
LikeLike
Wide back fabric is less expensive per square yard than quilting cottons, and generally stronger. With so many on line shops offering pretty choices (and the option to buy pfd and dye your own), why bother?
LikeLike
Because I have a gazillion yards of fabric already in my stash. 😆
LikeLike
Pingback: Kids Scrappy Quilt Tutorial (52" Throw) - Gluesticks Blog
Thank you!! I’ve been wanting to make a quilt for several years now,but never have because I wasn’t sure how to make a back for it. Thanks to you it’s onto happy quilting for me
LikeLike
Pingback: Buffalo Check Quilt Pattern (Makes a Large Throw) - Gluesticks Blog
I’ve used sheets before for a backing there’s no seems that way
LikeLike
This is an awesome tip, can’t wait to try it!!
LikeLike
Forgot to say THANK YOU!!!
LikeLike
Or use a flat sheet
LikeLike