Category Archives: tutorial

Compass 16-Patch Quilt

Compass Quilt Full Front

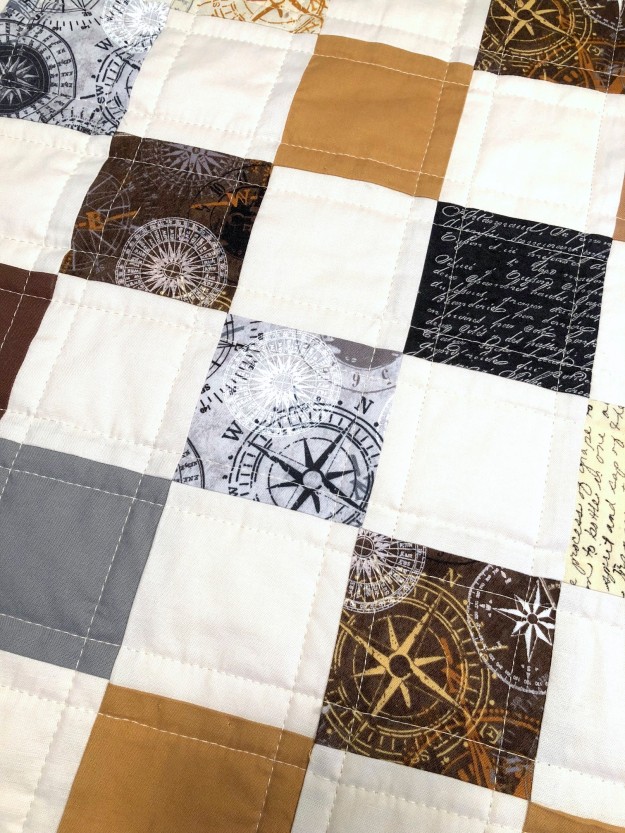
I found this really interesting line from Windham Fabrics called “Measure”.  They have fabrics that show compasses and rulers and writing and I just loved it.  I had been looking for a color palette of browns, creams and maybe a touch of black.  This fabric line was perfect for the 16-patch quilt I had in mind.

I’m also going to show you how I made the 16-patch blocks and give you my measurements for cutting.

Compass Quilt fabric pull.JPG

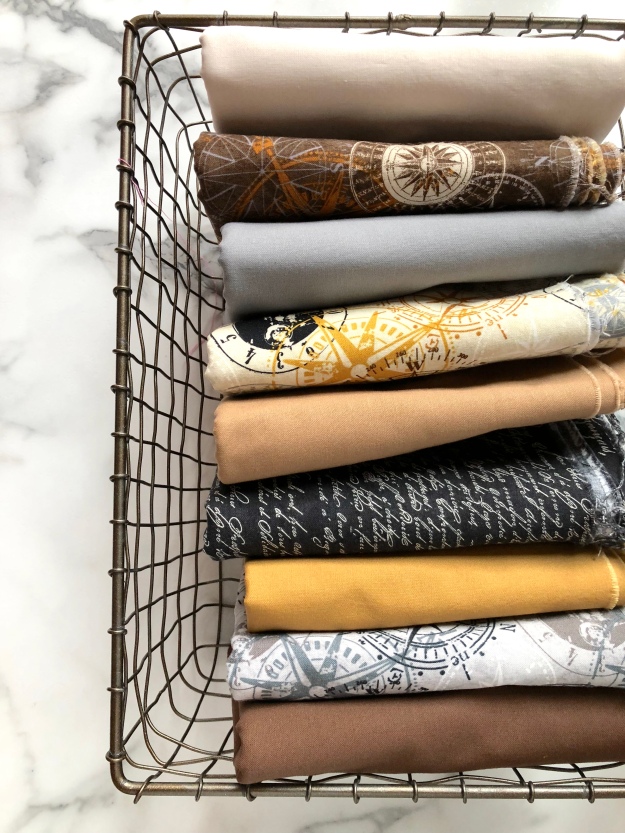
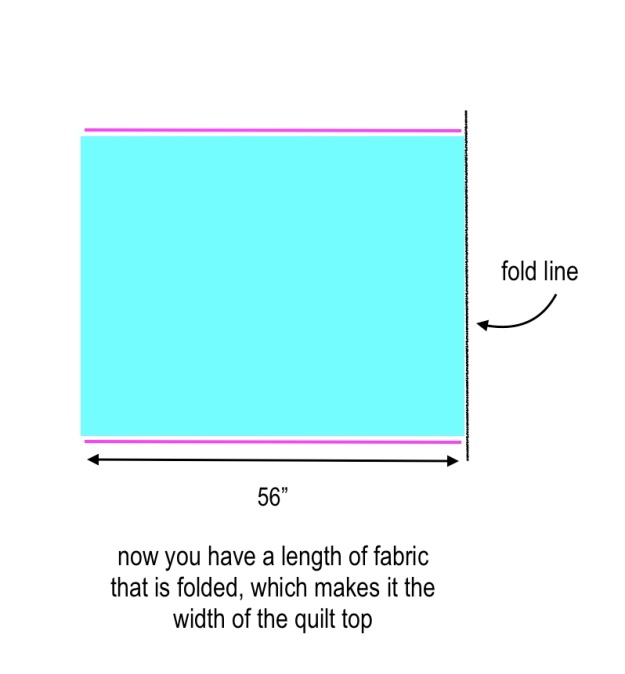
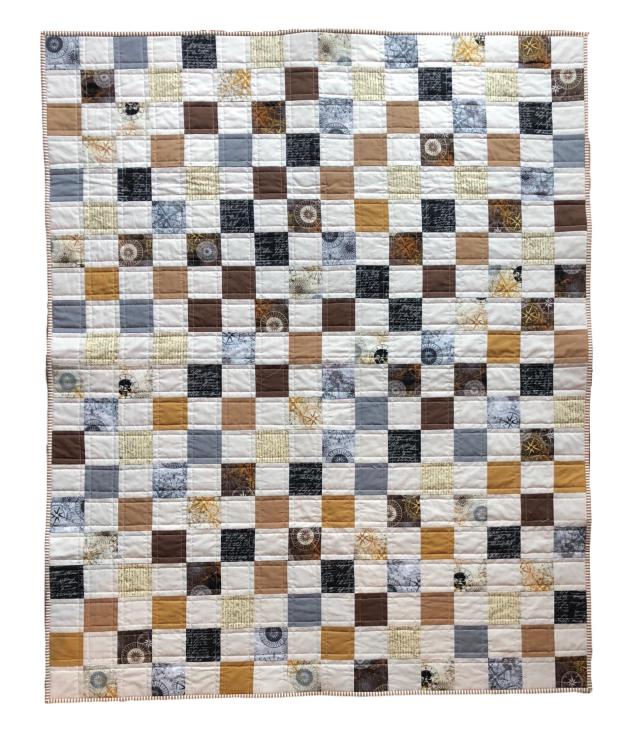
I added some Kona solids and another text print called “Bee Creative” by Deb Strain for Moda.  For the background, I used Kona Ivory.  The finished quilt size is 48″ x 60″, which I consider an ideal size for a throw quilt to curl up with on the sofa.

Compass Quilt over chair

Compass Quilt stacked

This quilt was composed of twenty 16-patch blocks.  The squares in the finished quilt are 3″.  The 16-patch blocks in the finished quilt are 12″.  I prewash all my fabrics – if there are any surprises, I want them now and not when I wash the finished quilt.

Compass Quilt folds

If you are interested in some of the particulars, here’s what I did:
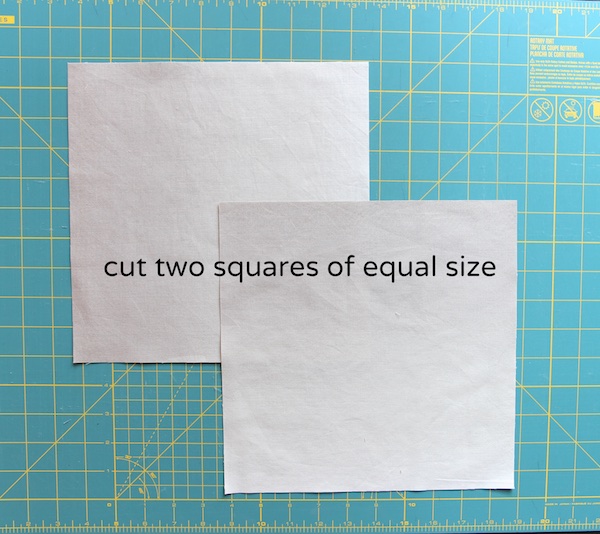
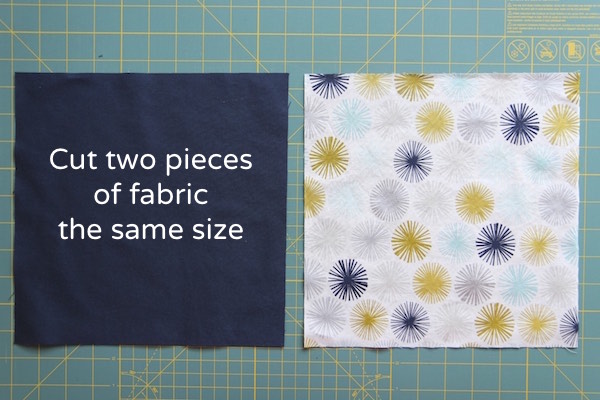
I cut (40) 3.5″ WOF strips total, 20 in the various prints and 20 in the background fabric.  You need 2 yards of the background fabric and 2 yards of various prints.

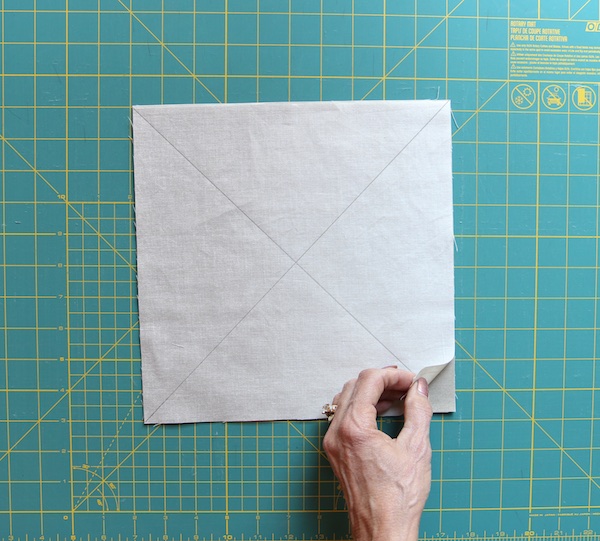
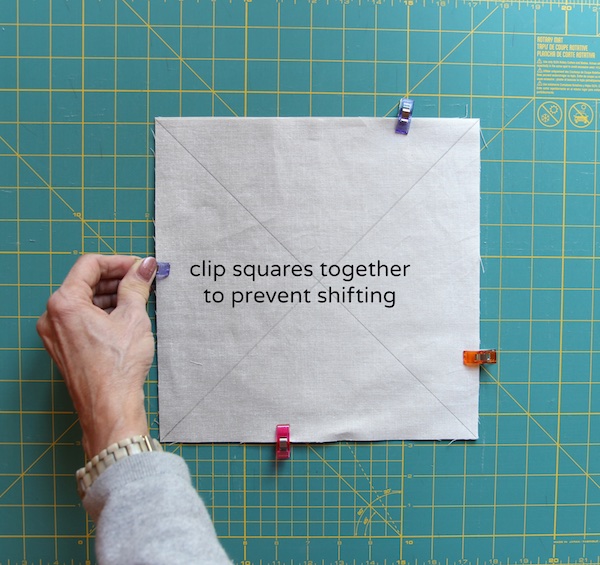
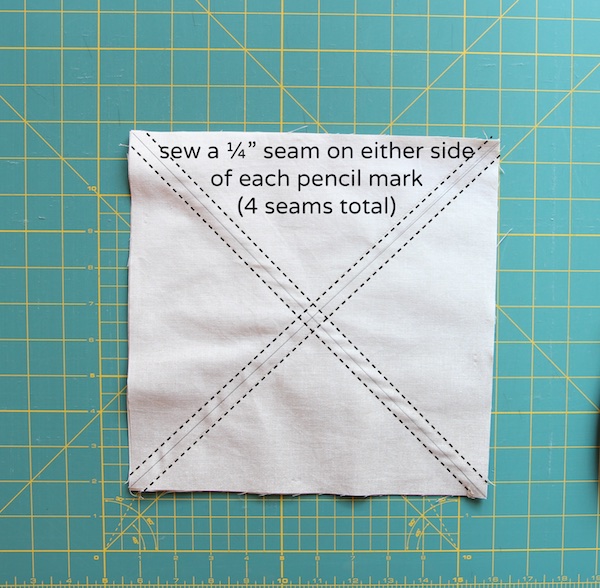
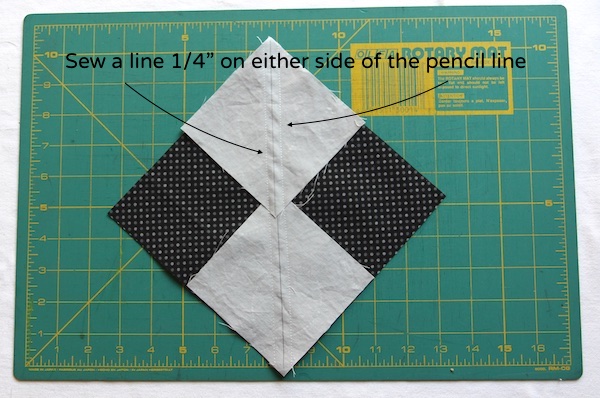
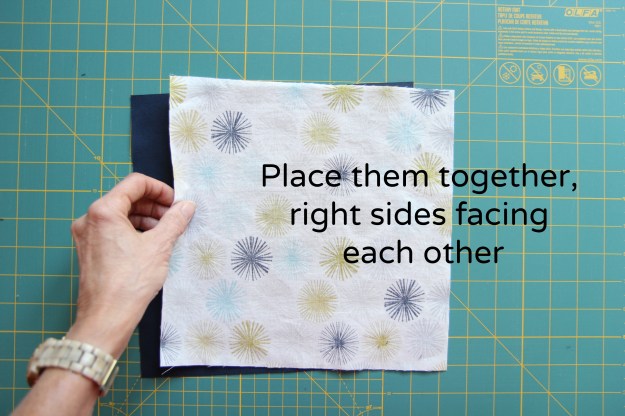
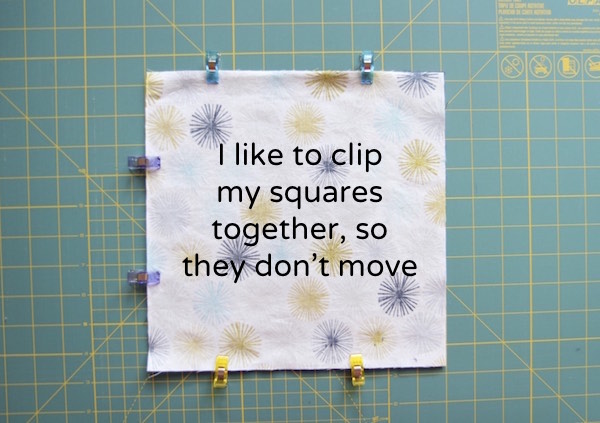
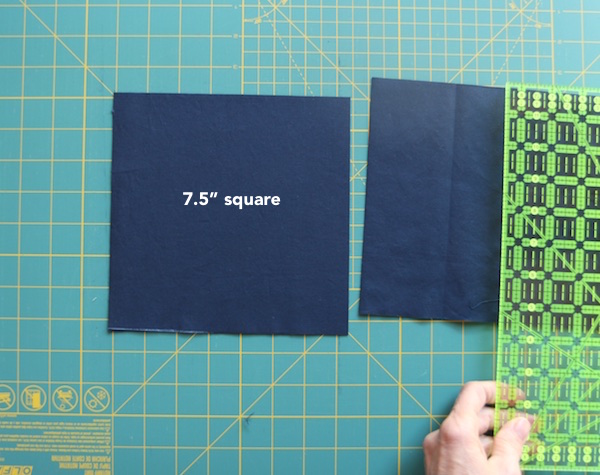
I cut the WOF strips into 15″ strips.  I sewed 2 prints and 2 background strips together, like this:

compass strips sewn together

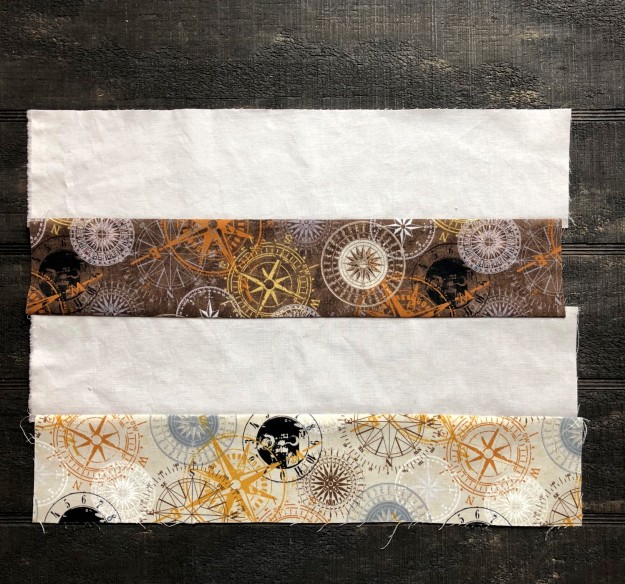
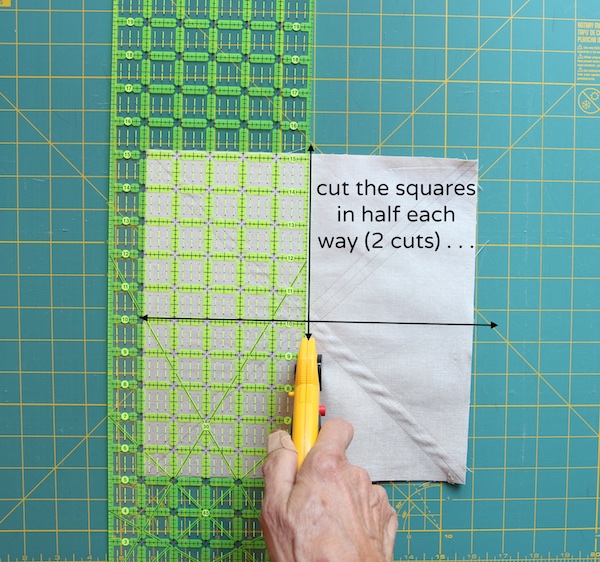
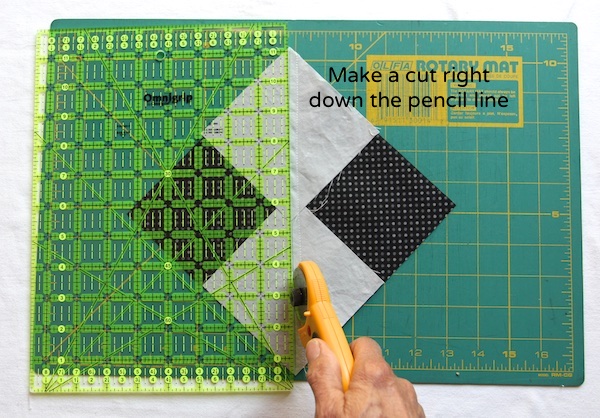
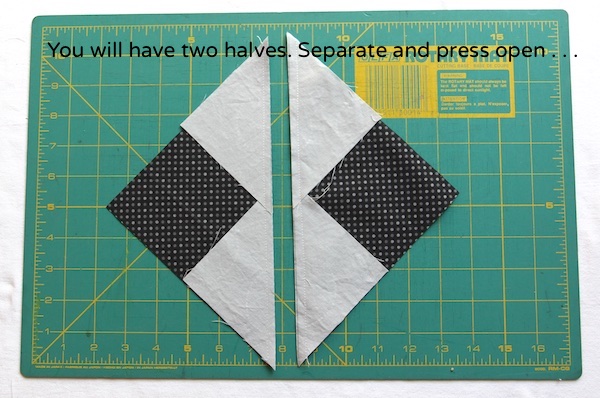
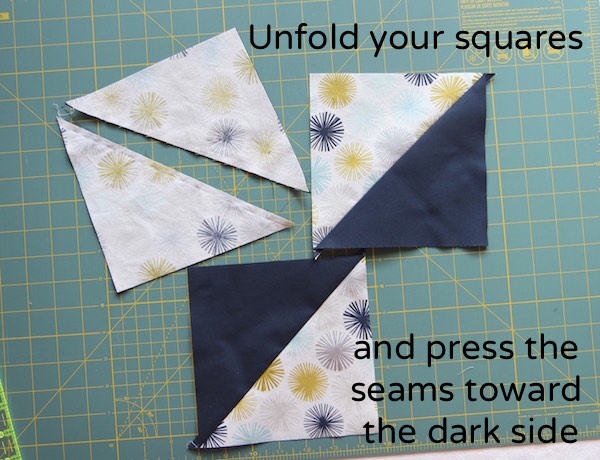
Press seams to dark sides.  This strip set gets subcut into (4) 3.5″ sections:

compass subcuts

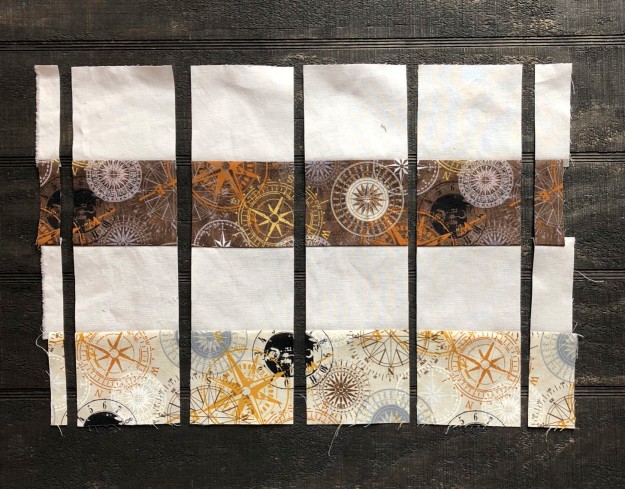
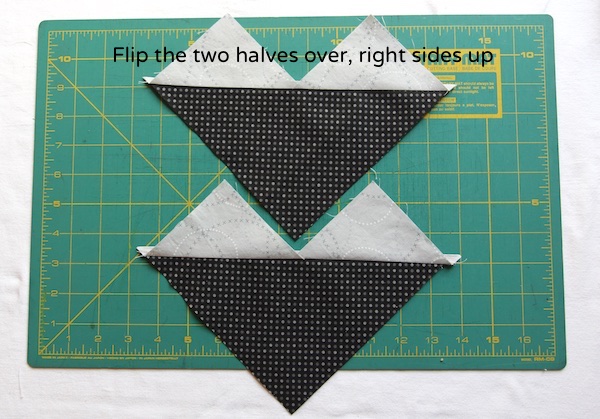
Repeat with your other prints, varying which fabrics you have in the top and third positions, so you have a great variety.

compass finshed subcuts

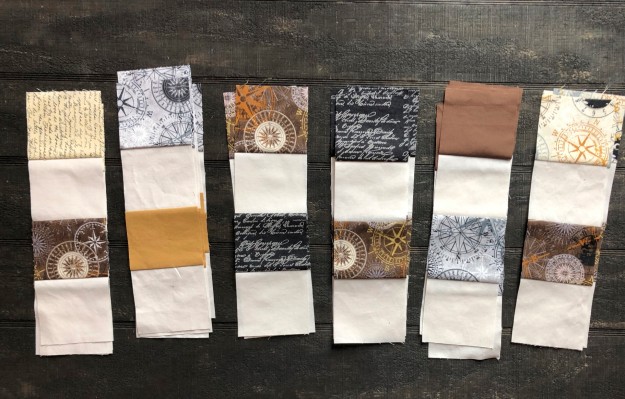
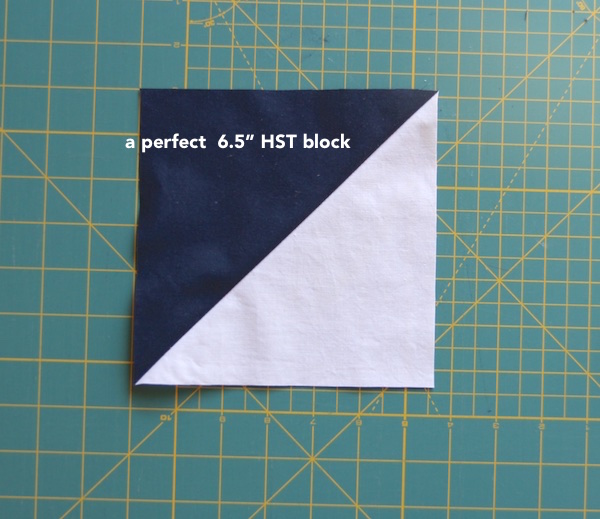
Then lay these out into 16-patch blocks, starting with a dark fabric in the top left position.

compass subcuts ready for sewing

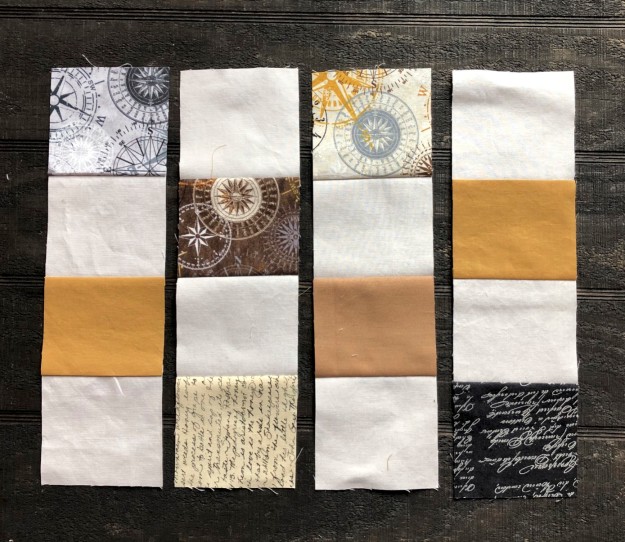
Sew together into blocks.  The seams should all nest.

finished compass block

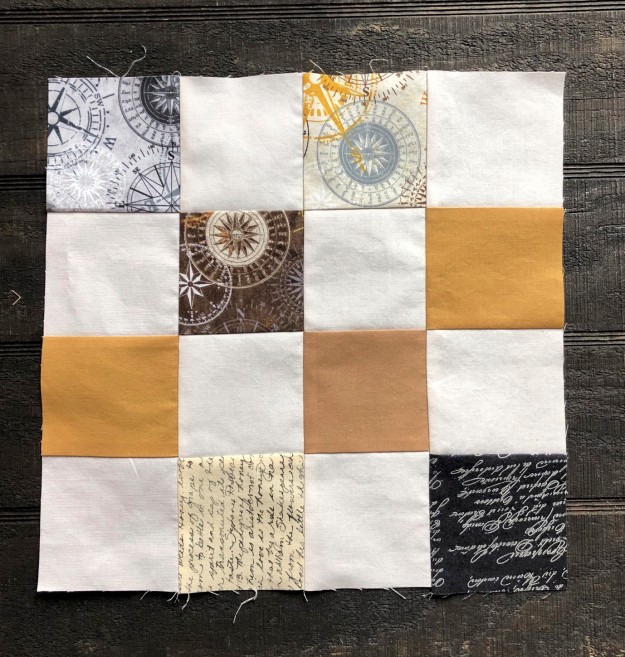
Repeat until you have 20 16-patch blocks and then just lay all the blocks in a pleasing array  – four blocks across, five blocks down, and sew together.

Compass Quilt folded

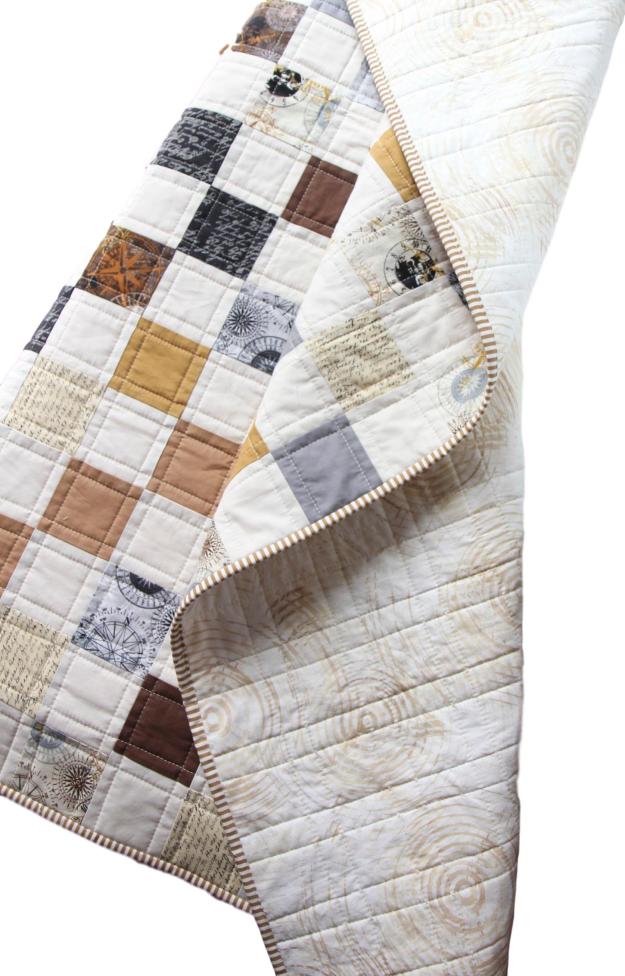
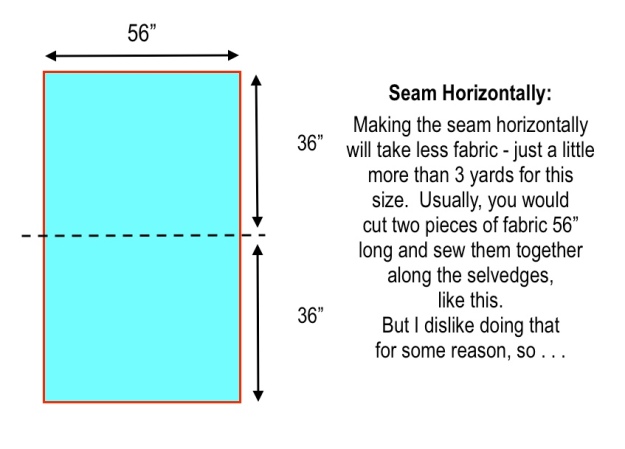
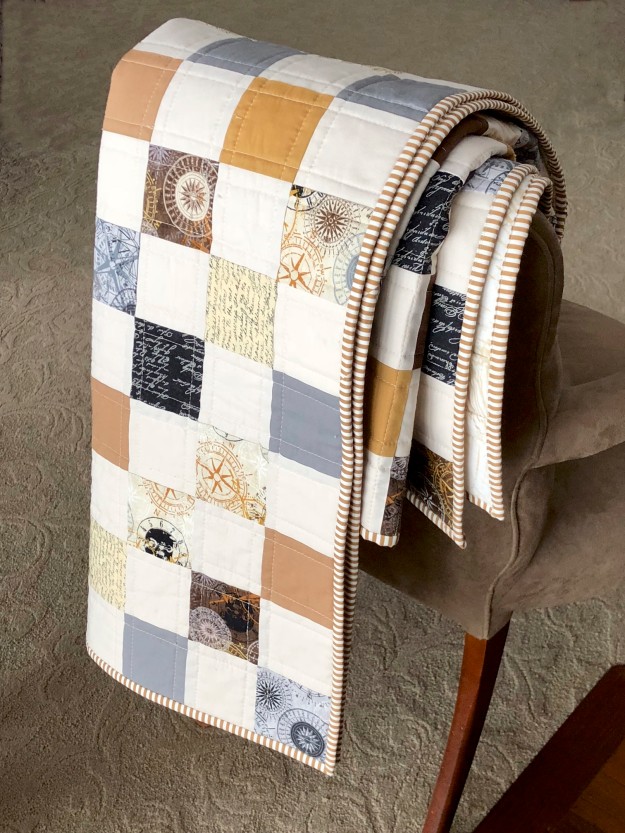
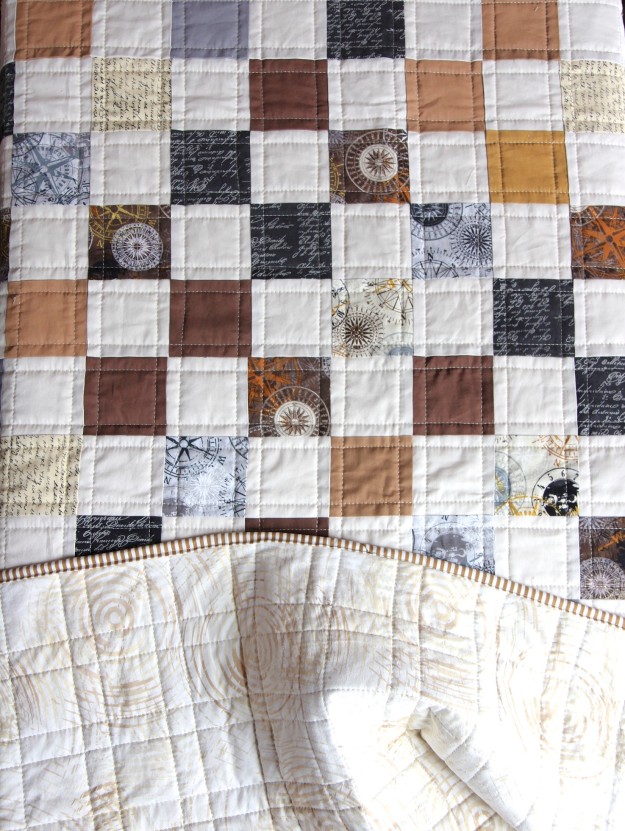
I used a fabric for the backing called “Henry Glass Principle Circle Play in Cream“.   It is a 108″ wide quiltback which is terrific – no piecing of the back!  There seems to be more 108″ wideback fabrics available now than there used to be.

henry glass fabric

Compass Quilt front and back

I used my new favorite quilt batting, Quilter’s Dream in the Supreme loft.  I love this batting – it’s more expensive, but it makes a heftier, cozier and softer quilt than Warm and Natural.

Compass Quilt in basket

I quilted this using a 4.5″ stitch length and used Aurifil 40# cotton thread.

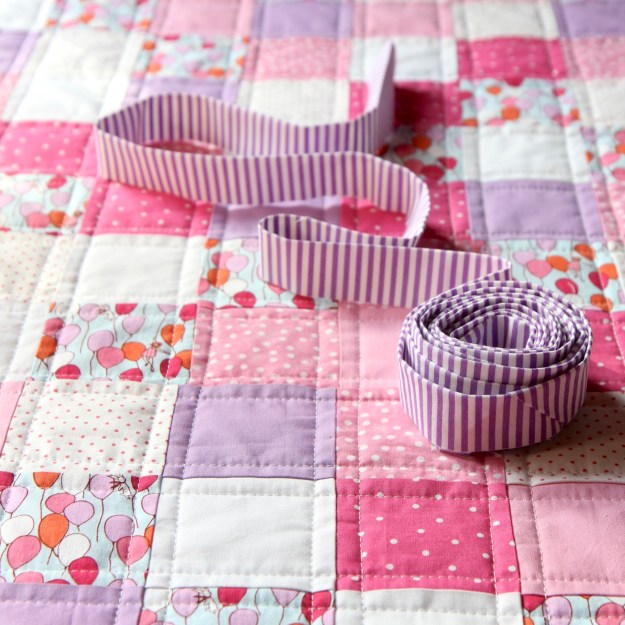
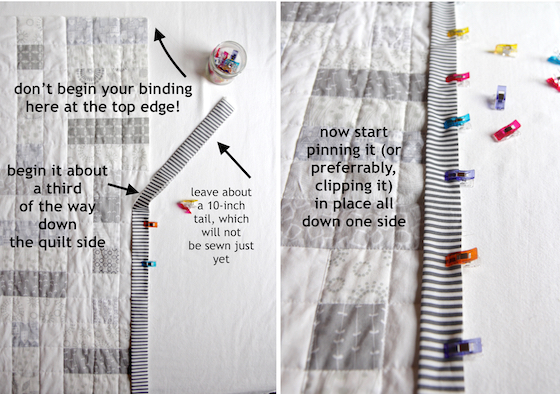
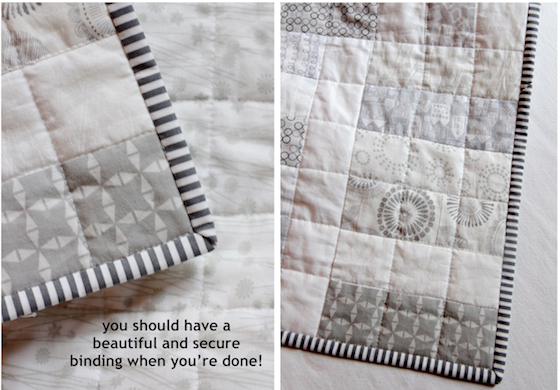
For the binding, I did go with a classic stripe.  Hawthorne Threads actually digitally prints lots of really interesting fabrics themselves and they do a whole line of stripes called “Dress Stripes” that are perfect for bindings – if you can’t find the color you want for stripes, check them out – they have almost any color you need.  I used “Ochre” for this binding.

Compass Quilt binding

Compass Quilt binding detail

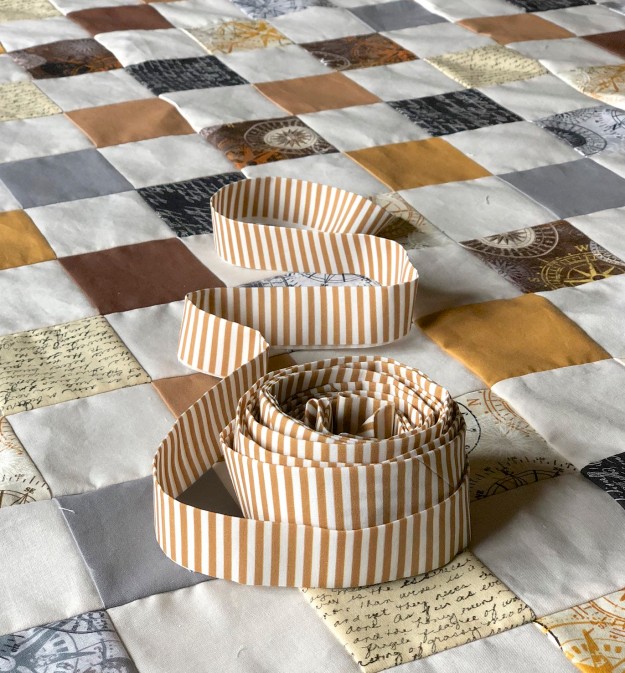
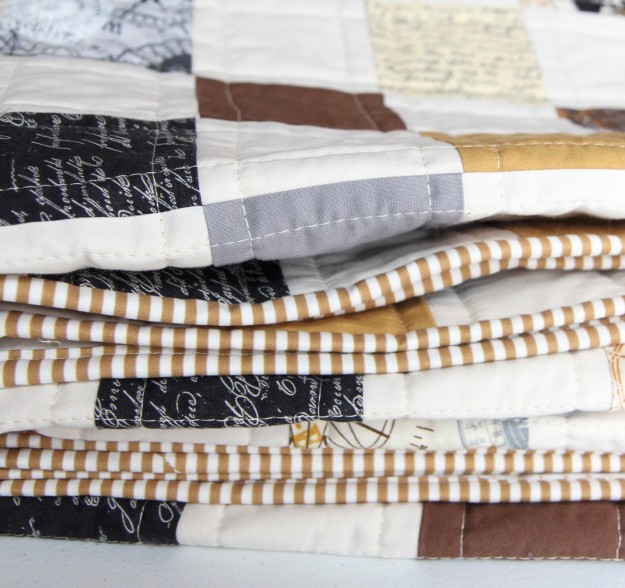
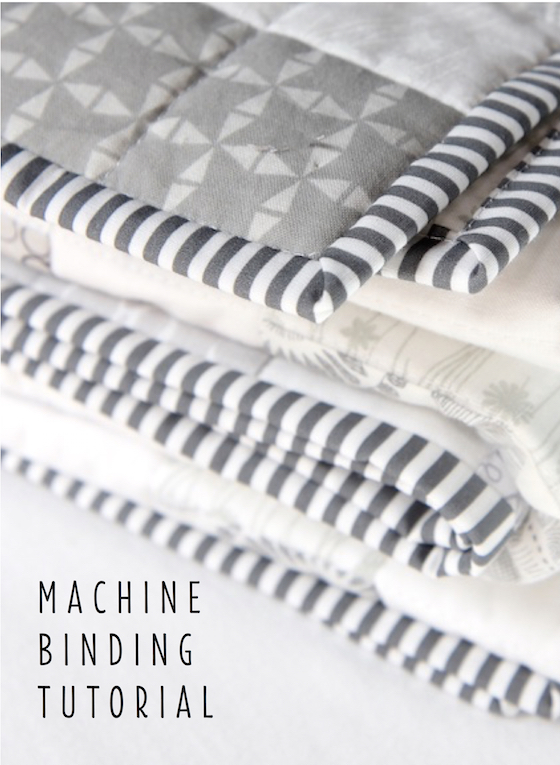
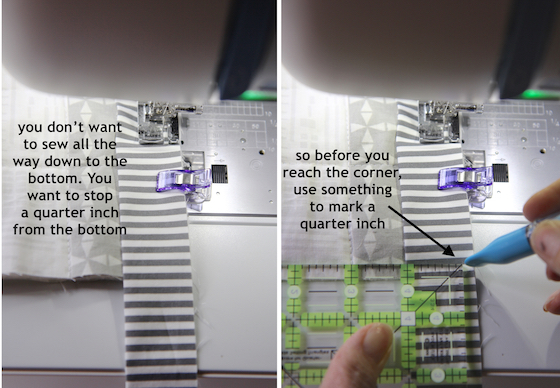
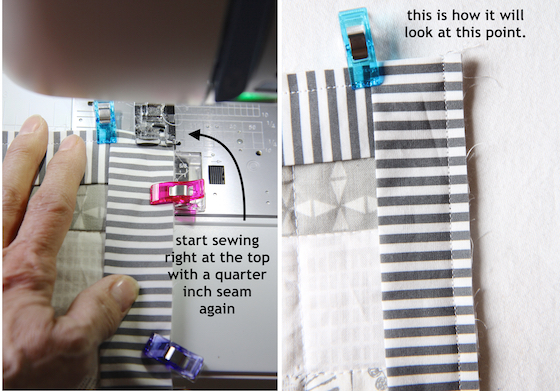
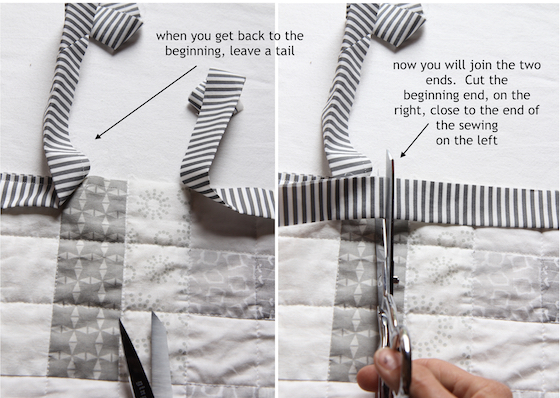
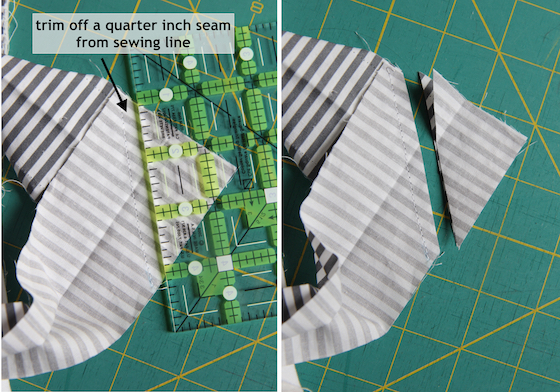
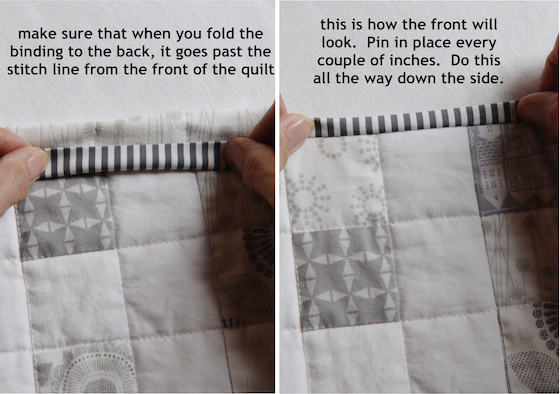
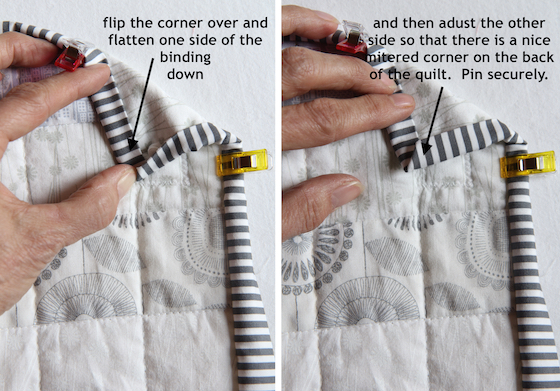
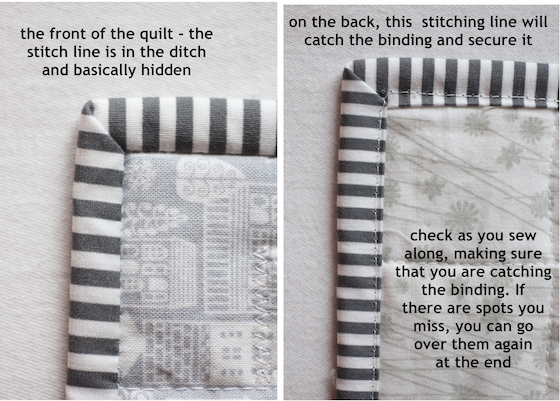
I cut 2.5″ strips for the binding.  I have a tutorial on how to machine bind a quilt, if you need to know how to do that.  I do use a walking foot when I attach the binding.

Compass Quilt fabric varation

Compass Quilt on chair

And here is the quilt after I washed it.  I definitely wanted that crinkle look for this one:

Compass Quilt Washed.jpg

Can’t wait to send this off to its new owner!

Thanks for stopping by.  Hope you’re making something!
Elaine


Children at Play Baby Quilt

Children at Play Back & Front

This is a custom order baby quilt and pillow that I just finished and wanted to share with you.  I was excited to use this “Children at Play” balloon fabric and had quite a nice time deciding which colors to pull out from it for the quilt.

Many of you contact me with questions about specifics on making quilts, so although this isn’t a pattern, I’m going to try to give you some better cutting details for this quilt.


Children at Play Closeup

The finished quilt measures 36″ x 48″.  It is made up of twelve 16-patch blocks. Each patch is 3″ finished.  I have prewashed all fabrics.

Here are the fabrics I used:

Seven different fabrics for the top:
(See cutting instructions below)
Robert Kaufman Kona Solid Pansy  –  3 strips
Robert Kaufman Kona Solid White  –   2 strips
Robert Kaufman Kona Solid Carnation  –  3 strips
Moda Essental Dots  –  3 strips
Michael Miller Children at Play Balloon   –  5 strips
Brother/Sister Design Studio Pink & White Dots  –  3 strips
Pink and White Dots (unidentified)  –  3 strips

Binding:  Michael Miller “Little Stripe” in purple (no longer available)
BackingMichael Miller Children at Play Balloon
 

Children at Play Fabric Pull

Children at Play Detail

To make the 16-patch blocks, I cut (22) 3.5″ strips of fabric from the WOF.    (I cut more strips from the balloon fabric than the solids or dots because I wanted the balloon fabric to repeat more  in the quilt.)  Then I cut these strips down into 16″ lengths. I sewed together four 16″ lengths to get a strip set.   I varied the position of the fabrics as much as I could to get different combinations of fabrics within each strip set for a total of 11 strip sets.  Then I subcut these strip sets into 3.5″ strips.  Four of these subcuts were sewn together randomly to make (11) 16-patch blocks.  I used the leftover fabric from the initial cutting of strips to make the 12th block that I needed.  I didn’t keep strict track, but I believe I used about 2.25 yards of fabric for the top.  I had scraps left over with which to make a pillow top also.

Children at Play Stacked II


Children at Play Strip Set I


Children At Play Strips


Children at Play Block


After you have all your blocks sewn, lay the blocks out to see what kind of order you want them in.  Sew them into rows, making sure to press the seams of the blocks all the same way in each row.   Alternate the direction of this for each row so that when you sew the rows together, the seams will nest.

Children At Play Quilt Binding


I used Warm and White for the batting.

The binding is a cute stripe from Michael Miller called “It’s a Girl Thing – Little Stripes” in purple.  Sadly, it’s no longer available. I considered a bright pink bias stripe first, but decided the purple was the perfect color for the binding.  I’m really glad I went with it. I cut 2.5″ strips and used this machine binding technique.  To cut 2.5″ strips quickly, I used my trusty Stripology ruler. I do love that thing.  Makes cutting lots of strips so fast.

Children at Play Stacked Binding

For the backing, I used the Michael Miller balloon fabric and was so happy with it.  It’s such a cute backing.  The little whimsical girls and rabbits are so fun.

Children at Play Fabric

I machine stitched the quilt with Aurifil Natural White in 40 wt.  It’s a little heavier than the 50 wt. and I like the way it stands out more for machine quilting.  (I do use the 50 wt. for piecing.)   I quilted this at a 4.0 stitch length with a walking foot.

Children at Play Label

Children at Play Quilt Front

There was also a Reading Pillow made to order to go along with the quilt.

Children at Play Pillow

This quilt is sold.

I do hope these instructions are helpful.  Feel free to contact me with any questions.

Hope you’re making something!

Elaine


How to Make a Super Easy Quilt Back

The only part of making a quilt that I do not enjoy is sewing the quilt back.  I just hate calculating the dimensions, cutting the pieces and then sewing them together.  There are many, many ways to make a quilt back.  You can even use 108″ wideback fabric, and not have to cut anything – but the fabric choices for those are limited. So, unless it’s a baby quilt, you almost always have to piece a quilt back. I can give you a method to make it a little easier. Instead of cutting two separate pieces of fabric and sewing them together, you cut one long piece, fold it together and then sew right down one side.  You then cut off the little fold line and open the fabric up and you’ve got a quilt back.  It’s very easy.

I get a lot of quilting questions from beginner quilters, so I am going to diagram this method out in a really basic way (I hope).  If you’re more of an advanced quilter, you won’t need such detailed instructions.

Keep in mind when you calculate dimensions for your quilt back, you have to take into account that although fabric width (WOF) is about 42 – 43″, you have to subtract the selvedges and you need to figure in ½” seams in your allowances.  Also, if you want an overage on your quilt back, making it a bit larger than your quilt top, adjust accordingly – I always allow a couple inches all the way around the quilt for an overage. So remember to allow for those in your calculations.  The example below doesn’t include overages – it’s just a example.

Also, I’ve recommended this phone app before and I use it all the time – it calculates how much yardage you will need for your backing.  It’s QuiltingCalc by Robert Kaufman.  Very handy.

This method actually works well for certain directional fabrics, because folding the fabric over on itself lines up the pattern in the same direction.  Also, this method only works on quilt tops which are under 80″ in length.

quilt-back-1quilt-back-2quilt-back-3quilt-back-4quilt-back-5quilt-back-6quilt-back-7quilt-back-8


quilt-back-9

Now just trim the length to the size you want.

Tips:

● Cut the selvedges off before you press the seam open – they are tighter and have less give than the fabric itself and can cause a pucker sometimes.  Make a big enough seam so that you can do this.  So make your sewing line ½” away from the selvedge.  Press the seam open so it lays flat.

● Use a walking foot if you can to sew the seam – it will move the fabric along better, so that it is even.

I hope these instructions make sense and that they are helpful.  Do you have a favorite method of piecing a quilt back?

Elaine

Save

Save

Save

Save

Save

Save

Save

Save

Make Eight Half Square Triangles at a Time With This Super Fast Method

8-hst-at-a-time

This is Method #3 in my tutorials on how to make Half Square Triangles.  The first method makes 2 at a time, the second  method makes 4 at a time and this method makes 8 at a time.  It is for sure the fastest way to make HSTs.  And it’s super easy – 2 squares of fabrics, sew 4 seams, make 4 cuts and trim.  You can really crank them out with this method.  And there are no bias edges on these blocks.

You begin with cutting two squares of fabric the same size.  I cut them generously because I like to trim my finished HST to size, so they are perfect.  Here is a chart to give you the sizes.  I have included a cutting size you can use if you don’t want to cut them oversize.

hst-8-at-a-time-chart


hst-8xtime-1

hst-8xtime-2

hst-8xtime-3

hst-8xtime-4

hst-8xtime-5

hst-8xtime-6

hst-8xtime-7

hst-8xtime-8

hst-8xtime-9

finished-hst-8-at-a-time


Four-at-a-Time No Waste Flying Geese Blocks

No Waste Flying Geese.jpg

I used to avoid making Flying Geese blocks because of all the wasted corners of fabrics you have to cut off.  I couldn’t bring myself to do that.  But did you know you can make Flying Geese blocks with no wasted fabric?  This was a game changer for me and now I love this block.

I’m showing you how to make these blocks four at a time. I like to make these a little oversize, so I can trim them to perfect sizes.  You cut one large square of fabric from the fabric you want for your Flying Geese (your main fabric).  Then you cut four small squares from your background fabric.  This chart shows you what to cut for various sizes.  Remember – the finished Flying Geese Size in the chart is after being sewn into your project.  After you trim them (before they are sewn in) they will be ½” larger than your desired finished size, so that you have ¼” seam allowance to work with.

I hope this tutorial is helpful.  Some Flying Geese tutorials are complicated and don’t seem to explain the technique very well – I hoped to make one that is very simple to follow.   Happy Sewing!

flying-geese-chart

With this method, you will end up with four Flying Geese blocks.

flying-geese-tutorial-1flying-geese-tutorial-2flying-geese-tutorial-5flying-geese-tutorial-6flying-geese-tutorial-7flying-geese-tutorial-8flying-geese-tutorial-9flying-geese-tutorial-10flying-geese-tutorial-11flying-geese-tutorial-12flying-geese-tutorial-13flying-geese-tutorial-14flying-geese-tutorial-15

I like to trim my blocks  with Bloc Loc Rulersflying-geese-tutorial-16

Save

Save

Save

Save

Save

Save

Save

Save

Save

Save

Save

Half Square Triangle Tutorial, Method II, Four at a Time

Half Square Triangle Tutorial Four at a TIme

I promised you way back when that I would post about how to make Half Square Triangles using a different method, making four at a time.  The HST continues to be the most fun block to design with, because of the endless combinations  you can make with it.  In my first tutorial, I showed you how to make one at a time.  This second method, making four at a time, is super easy and very fast.  The only drawback to this method is that you will end up with edges that are bias edges – which just means they can stretch a little bit.  So, when pressing these blocks, be extra careful not to iron them and stretch them out – just press them.

The advantage to this method is that it is super fast – you just place two squares of fabric, right sides together, sew a quarter inch seam around the entire outside edge, cut an “X” corner to corner and you have four HSTs.  All you need to do is press them open and trim off the little dog ear corners.  You don’t even need to draw any lines with a pencil on your fabric with this method.

In order to figure out how big to cut the two squares of fabric, the calculation is very easy. Do not be scared of the following math! Figure out how big you want your HSTs – and that means the size of your “unfinished” HSTs, before you sew them together into your quilt – and divide by .64, which is easy to do on your calculator.  For instance, if I wanted finished 3″ blocks in my quilt, I would need 3.5″ unfinished HSTs.   So I just take 3.5 and divide by .64 and I get 5.468, which I will then round up to 5.5″ squares of fabric.

3.5 ÷ .64 = 5.46875  so I will round this up to 5.5
I will cut 5.5″ squares of fabric to make 3.5″ “unfinished” HSTs,
which will end up being 3″ finished HSTs in my quilt

When using this calculation, keep in mind that this is not an oversized HST that you will trim. If you like to make your HSTs oversized and then trim them, down, just calculate a little bigger and then you can do that.  To trim them down to a perfect HST, this technique is my favorite for trimming.

In my next tutorial on the HST, I will show you Method III – how to make eight at a time!

I hope this tutorial is helpful!

Elaine

HST II two fabrics squares

HST II fabric squares together

HST II clipping fabric squares

HST II sewing perimeter

(Above: I flipped the square over to the dark side so you can see the stitching)

HST II cutting line on square

tip: the cutting is easier to do on a small little cutting mat, if you have one, because you can make the first cut, spin the whole mat around and make the second cut.

HST II cutting squares

HST II cut squares

HST II opening squares

HST II trimming squares

Half Square Triangle Tutorial – Method I (Traditional)

HST Tutorial

If there’s one block in all of quilting that you should know how to make, it’s the Half Square Triangle (HST).  To me, it’s the most versatile block in quilting and you can do endless things with it in design.  With this one block, I can make a wide variety of quilts. In this post, I’m going to show you the Traditional Method of making them, two at a time.  In my next post, I will show you a way of making them four at a time.

This technique is simple and easy to learn and is actually very quick after you get an “assembly line” system going.  Two squares of fabric are cut, placed right sides together (RST), sewn from corner to corner and cut apart.  You end up with two HST blocks.

hsts in progress

To figure out what size to cut your squares of fabric to sew these up with, you need to determine what size you want your working (finished) blocks to be (before sewing them into your quilt). When you determine what size you want your working blocks, just add one inch.   Lots of people recommend that you add 7/8″ to the desired size, but I like to add one whole inch. I want a little bit of extra fabric in the end so that I can square up my blocks nicely and it makes the calculations easier.  So if you want a finished working block size of 6.5″, you need to cut squares of fabric that are 7.5″.  (Remember that after you sew your 6.5″ finished blocks into your quilt, you will lose the half inch in the seams and they will be 6″ blocks in your finished quilt.)
With this method, you don’t need any chart to figure out how big to cut your squares.

Desired Finished Block Size + one inch = how big to cut your squares

This method makes two HSTs at a time.

HST I 1 HST I 2HST I 3 HST I 4 HST I 5 HST I 6HST I 7HST I 8HST I 9HST I 10HST I 11HST I 12HST I 13HST I 14HST I 15HST I 16HST I 17

Machine Binding Tutorial

MachineBindingTutorial1

Having a beautiful mitered binding on a quilt is the perfect finishing touch and the part I love the most. There are different ways to produce a binding like this  – I prefer to stitch my binding down on the front, wrap it around to the back and stitch in the ditch on the front, so the stitches are hidden and the sewing line only shows on the back.  It is just personal preference and you will have to decide how you like your binding to look.

I like to make my own binding, choosing a fabric that complements the quilt and sets it off nicely. A stripey binding is very popular with quilters and adds a little zing to the edges.  Any small repeat is nice, too.  You can also use a solid or even use scraps and make a scrappy binding.

You will be cutting strips cross-grain to make this kind of binding and then sewing them together to make one long continuous strip.  The tutorial shows you how to join the strips together on a diagonal, so the seams lay a little nicer.

This binding is not difficult to do, but requires slow stitching for precision.  I recommend using Wonder Clips from Clover instead of pins.  They are faster, easier to use and more precise.  They will hold your binding better than pins and will not shift as you clip and unclip them.

Calculating Yardage:
There are several ways to calculate how much yardage/strips you will need to make your binding.  Different people use different formulas, some of which are way too generous and I think waste a lot of fabric.  I personally love to use this app by Robert Kaufman that is super easy.  I downloaded it from the iTunes store and I highly recommend it.

If you don’t want to use a phone app, here is a web site that functions very close to the Robert Kaufman app and is very easy to calculate your binding: lily street quilts.  Just plug in the dimensions of your quilt and scroll down to the bottom of the page and plug in your binding width desired.  Click “calculate” and it will give you the yardage and # of strips you need.

If you don’t want to use an app like this, here is a good formula to calculate the strips.  You simply add up the sides of the quilt (width, width, length, length), add a few extra inches for the corners (about 10) and the tail ends and divide by 40, which is a safe usable area of fabric from a common 44/45″ width piece of fabric:

W+W+L+L+10″ ÷ 40 = how many strips you will need (always round up)


STEP-BY-STEP PHOTO TUTORIAL:
Make your binding by cutting strips from selvage to selvage:

bindingpage1

bindingpage2

bindingpage3

bindingpage4

bindingpage5

bindingpage6

bindingpage7

bindingpage8

bindingpage9

bindingpage13

bindingpage11

bindingpage12

bindingpage14new

bindingpage15


bindingpage16


bindingpage17


bindingpage18


bindingpage19


bindingpage20


bindingpage21


bindingpage23


bindingpage24


bindingpage25


bindingpage26


bindingpage27


bindingpage28


bindingpage29

Save

Save

Save