
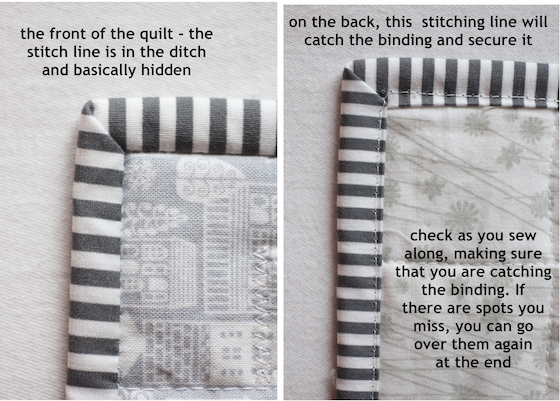
Having a beautiful mitered binding on a quilt is the perfect finishing touch and the part I love the most. There are different ways to produce a binding like this – I prefer to stitch my binding down on the front, wrap it around to the back and stitch in the ditch on the front, so the stitches are hidden and the sewing line only shows on the back. It is just personal preference and you will have to decide how you like your binding to look.
I like to make my own binding, choosing a fabric that complements the quilt and sets it off nicely. A stripey binding is very popular with quilters and adds a little zing to the edges. Any small repeat is nice, too. You can also use a solid or even use scraps and make a scrappy binding.
You will be cutting strips cross-grain to make this kind of binding and then sewing them together to make one long continuous strip. The tutorial shows you how to join the strips together on a diagonal, so the seams lay a little nicer.
This binding is not difficult to do, but requires slow stitching for precision. I recommend using Wonder Clips from Clover instead of pins. They are faster, easier to use and more precise. They will hold your binding better than pins and will not shift as you clip and unclip them.
Calculating Yardage:
There are several ways to calculate how much yardage/strips you will need to make your binding. Different people use different formulas, some of which are way too generous and I think waste a lot of fabric. I personally love to use this app by Robert Kaufman that is super easy. I downloaded it from the iTunes store and I highly recommend it.
If you don’t want to use a phone app, here is a web site that functions very close to the Robert Kaufman app and is very easy to calculate your binding: lily street quilts. Just plug in the dimensions of your quilt and scroll down to the bottom of the page and plug in your binding width desired. Click “calculate” and it will give you the yardage and # of strips you need.
If you don’t want to use an app like this, here is a good formula to calculate the strips. You simply add up the sides of the quilt (width, width, length, length), add a few extra inches for the corners (about 10) and the tail ends and divide by 40, which is a safe usable area of fabric from a common 44/45″ width piece of fabric:
W+W+L+L+10″ ÷ 40 = how many strips you will need (always round up)
STEP-BY-STEP PHOTO TUTORIAL:
Make your binding by cutting strips from selvage to selvage:


Pingback: Grey Goose Quilt | Beech Tree Lane Handmade
Great tutorial! This is exactly as I bind except I prefer to hand stitch the back of the binding down.
LikeLike
Thanks, Karen!
LikeLike
Question. What sewing machine do you have? I’m in the market of a new one
F
LikeLike
Felicia: I bought a Janome Skyline S5 a couple of years ago and love it. The newer Janome Skyline S7 has a couple of more features on it that look terrific, one being an automatic presser foot lift setting after you stop sewing and an integrated walking foot. I do love my Janome and it sews like a dream.
LikeLike
Pingback: Little Owl Baby Quilt | Beech Tree Lane Handmade
Pingback: Little Owl Reading Pillow and Bib | Beech Tree Lane Handmade
Great tutorial binding made easy
LikeLike
Pingback: Machine Binding Tutorial | painesblog
Pingback: Navy Blue & White Gingham Quilt | Beech Tree Lane Handmade
Elaine—have followed your cooking blog for many years (2009), and just found your quilt blog. I LOVE this machine binding tutorial you have done, but for the life of me, I can’t get it to print! Never had this problem printing your recipes. Is there a trick to this one, or something special I should be doing? It prints the title, and the page number, then gives me the rest of the pages blank…….HELP!
LikeLike
Diane: Glad you like the tutorial! I just tried printing it out myself and it worked fine. When you go to print it, check your Print Preview. In the Print Preview on my Mac with my Epson printer, it does look like the first page is just the title and then a blank page, but if you click on the preview of the following pages, they should be there. Of course, this will vary depending on what kind of printer you are using! Let me know!
LikeLike
Pingback: 1930’s Style Diamond Scrap Quilt | Beech Tree Lane Handmade
You’re my new best friend! Thank you so much for creating this tutorial. I saved hours of my day from hand sewing the back of the binding to the quilt. As a small shop owner that is really important. I’ve tried other machine binding tutorials with nowhere near as professional results! Thanks again!
LikeLike
Lindsay: Thank you for letting me know that! I’m so glad you found it helpful.
LikeLike
Hi. I am new to all off this. Years ago I hand quilted a bed quilt but have not idea how. I have been requested but my now daughter-in-law to make a baby quilt floor mat. I cannot remember the steps. I know there is batting behind the squares which I will see (I won’t hand quilt), but what is behind that other than the actual backing? Is there Muslim holding the batting or is this not necessary?
LikeLike
Hannah: The quilt is made up of a “quilt sandwich”. The sandwich contains three layers: the top of the quilt, the bottom (or backing) of the quilt and the batting in between these two layers. That’s it. The backing can be one fabric that complements the top of the quilt or it, too, can be pieced. You have to have some way to hold this sandwich together – you can simply tie the quilt or you can machine or hand stitch the quilt. If you tie the quilt, you don’t need to make a binding if you don’t want. I think one of most helpful things for you to do is to get on Craftsy and take an online beginning quilting class. Craftsy is great and you can do this at your own pace: https://www.craftsy.com/quilting/classes/piece-patch-quilt-basic-quiltmaking-skills/35355
Hope this helps!
LikeLike
A “Muslim ” holding the batting?! Autocorrect! I guess it’s a pretty easy typo to make on a phone. That’s why I always double check before I hit “post”! 😉
LikeLike
Thank you, thank you, thank you for this tutorial!! I just completed my first ever quilt (baby) using this. I had a few spots I had to go back and fix up after the final stitching, but overall it worked great! You made my day! 🙂 ps. I’ll tag you on IG when I post a photo of it tomorrow!
LikeLike
Thank you for sharing, Wendy! That just makes my day! Can’t wait to see the photo of your quilt.
LikeLike
This is the clearest and most well-made tutorial on machine binding I have ever seen. Thank you so much! I hope this is going to get me over my fear of machine binding.
LikeLike
Susan: Thank you so much! That totally makes my day that I could help you. If you want to practice machine binding before tackling a quilt, try making a couple of small mug rugs and finish them with a binding- it is a great way to practice. You will get good at it the more you do it!
LikeLike
I have quilted for many years and I’ve never liked the looks of my binding. I followed your directions and I was so happy with how good it looks. Your clear directions are easy to follow.
I also used my walking foot (first time) and was impressed with how smooth everything went. Thank you so much!
LikeLike
Dolores: Thanks so much for sharing! You will love your walking foot – it is absolutely essential for smooth quilting.
LikeLike
This is probably the best tutorial I have seen on binding. It is very clear and easy to follow. I have been frustrated with other tutorials because of not being able to understand what is being said and shown. Thank you for being so concise. I am new to quilting and need the step by step.
LikeLike
Thank you jkmstar! I made a point of putting text on each photo, which I think is easier to follow than a paragraph below a bunch of photos. I’m glad it helped you!
LikeLiked by 1 person
Pingback: Quilting: the Final Frontier – Red Shoes. Red Wine.
Pingback: Quilting Outside the Box – Red Shoes. Red Wine.
Thank you so very, very much for sharing this, it is most precise Tutorial I have seen. I am new to quilting and I am just about to bind my first lap quilt, now seeing this it doesn’t feel quite so daunting thanks to you!!! Sending you a big {{hug}}
LikeLike
This was wonderful! I just finished my first lap quilt and your tutorial helped me with the most intimidating part… binding! Your step-by-step instructions made it easy and I LOVE the final product. THANK YOU!
LikeLike
Pingback: Ombre Half Square Triangle Quilt | Beech Tree Lane Handmade
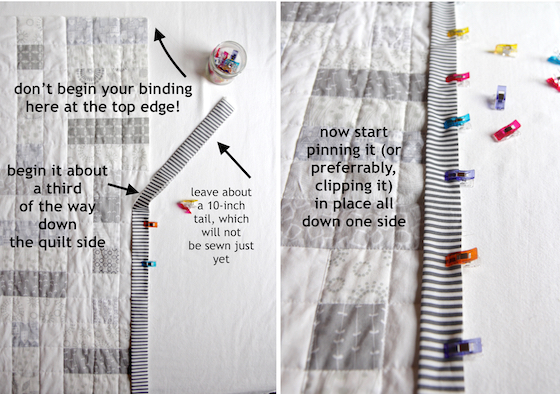
Thank you! I’m the greenest beginner out there! Ha! This is so helpful, but I do have one question… when you pin the binding down (before you sew it on at all), do you pin it to the top side of the quilt, or does it matter? Thanks!
LikeLike
Megan: Yes, you sew the binding to the top first, in my method. Then you wrap the binding around to the back. Take a look at the photos again – you can see this in the photos. Hope this helps!
LikeLiked by 1 person
Aha! Thank you! That’s what I was thinking, but I wanted to double check.
LikeLike
Very very well explained!!Thanks a lot!
LikeLike
Thank you!A very comprehensive and professional tutorial! I found it most helpful.
LikeLike
Finally! A detailed, well-illustrated tutorial. This is the basic technique I’ve used but have always struggled with making the bias strips without a couple tries, getting the corner sewn accurately, and then the join of the ends. With these precise instructions I won’t be struggling again. Thanks!
LikeLike
Thank you so much for your machine binding tutorial as I am teaching myself to quilt and the detail is wonderful. I am very much a visual learner so is perfect for me and once my quilting project is finished, I will now be able to bind with confidence knowing thanks to you it will have a beautiful finish.
LikeLike
Thanks for this excellent tutorial. As a self-taught, Google- and You Tube-taught quilter, I’ve read about and tried many methods of finishing off those pesky tails. This is so simple and straightforward, I could hug you!!
LikeLike
Pat: That makes my day! Thanks!
LikeLike
Thank you!
LikeLike
Thank you so much for posting this tutorial. You have done it so clearly with all the pix showing exactly how it ought to look at each step. This makes it way…much easier for me.
Absolutely love it! Once again, thanx so much. It saves SO much time!
LikeLike
Thank you for this very details tutorial. Exactly what I need.
LikeLike
This was an awesome tutorial. Thankyou for being so clear. I was taught to hand stitch the binding on the back and I hate it so I will try sewing it into the ditch and hopefully I can do a good job I’m still a bit of a rookie.
I just had one question. I am making a baby quilt out of navy and white in a chevron pattern and the binding will be in mustard. Would you recommend using a mustard colour thread on the binding also or the same colour that I will use to quilt the quilt which I think I will use navy for the quilting.
Thankyou in advance xx
LikeLike
Grace: I would use a white quilt on the front because your stitching will be right in the ditch and actually shouldn’t touch the mustard binding on the front. It will be pretty much hidden right in the ditch. Stitch slowly until you get the hang on it and your stitching on the front shouldn’t really even show. You should use a mustard colored thread, of course, in your bobbin because your stitching on the back of the quilt will be right on top of the binding. hope this helps!
LikeLike
Thank you so much. I have been quilting for years and always hated how the binding would come out. I love my binding. Thank you so much.
LikeLike
Pingback: Pinwheel Child’s Quilt | Beech Tree Lane Handmade
Pingback: Hip Hooray Baby Quilt | Beech Tree Lane Handmade
Pingback: Safari Baby Quilt | Beech Tree Lane Handmade
I’m so frustrated that I can’t get the mitered corner to be flat. It is almost always bulky and rounded. Sometimes not as bad as others, don’t know why that is either!
LikeLike
Dispack: next time I do a mitered corner, I will do a little video and put it on Instagram! Are you on Instagram?
LikeLike
I’ve watched several binding tutorials, and this is the absolute best one yet!
LikeLike
Thank you, Judith! That makes my day.
LikeLike
This is now my go to binding tutorial! Thank you for great pics and simple comments. I don’t do this very often but when you need it you NEED it! Thanks again!
LikeLike
I just used this tutorial to bind my first quilt! I was shocked at how easy it was following your step by step instructions and photos. Thank you so much for creating this wonderful tutorial!
LikeLike
Actually, I used your baby owl tutorial for the whole quilt and this tutorial for the binding. Thank you so much for BOTH!
LikeLike
Amanda: Thank you so much for that! That makes my day and makes doing those tutorials so worthwhile! I love that. Happy sewing!
LikeLike
What width do you make your binding strip? I have trouble having enough fabric to flip over, and have it in the spot for sewing on from the front? Thanks!
LikeLike
In the first photo, I show the binding strips as 2.5″ wide. This is the width that is comfortable for me to have enough fabric to wrap around the back and stitch down easily. Hope this helps.
LikeLike
Pingback: Children at Play Baby Quilt | Beech Tree Lane Handmade
Pingback: Grey and Mustard Arrow Quilt | Beech Tree Lane Handmade
This is an awesome tutorial. I sew my bindings on a little differently but I like the look of not having a seam showing on the binding on the front of the quilt. With the way I do it, I sew the binding on the back first and sew it down on the front. I will definitely try your technique.
LikeLike
Pingback: Compass 16-Patch Quilt | Beech Tree Lane Handmade
Pingback: Little Lamb Checkerboard Quilt | Beech Tree Lane Handmade
So, I think this tutorial will help me bind the two baby quilts I am making based on your little owl quilt. I would like to try to cut the stripes on a diagonal like you did but I can’t figure out how to do that. Any help is appreciated. I need to bind the quilts soon…..LOL. No pressure. LOL Thanks!
LikeLike
Kelly: I love bias binding and now there is an even easier way to do it, rather than cutting fabric on the diagonal. If you go to Hawthorne Threads online fabric store, they make fabric that is printed on the diagonal for bias stripes. There are other manufacturers who are starting to make bias stripes and you can look and try to find some of those. But Hawthorne has a stripe that they offer in many different colors, so you should be able to find one you like. You can find them here. Also, if you read my post about “Shifting Strips Beach Quilt” I used that particular stripe as the binding so you can see how it looks! Hope this helps.
LikeLike
Thank you for your response however I will have to save it for the next quilt. I am binding today and will just cut on the bias and hope it works. I am loving these two quilts and will try to figure out how to send you a picture. Couldn’t have made them without your post!
LikeLike
Pingback: Ombré Confetti Herringbone Child’s Quilt | Beech Tree Lane Handmade
My corners were not turning out until I snipped off a bit of the corner seam. Do you trim your corners before turning?
LikeLike
Marilyn: You know, sometimes I do that, too, if I feel I have too much bulk in my corners. Most of the time I do not need to do that. Next time you sew binding on, maybe sew a bit smaller seam when you approach the corners. This may help.
LikeLike
Pingback: Ombre Confetti Metallic Baby Quilt and Pillow | Beech Tree Lane Handmade
Pingback: Sugar Sack Quilt, Cuddle Blankie & Pillow | Beech Tree Lane Handmade
GREAT TUTORIAL! Thank you!
LikeLike
Pingback: Burly Beaver Buffalo Plaid Quilt - five to six handmade